In today's article we are going to take a closer look at CSS selectors, where they originated from, and how they can help you in extracting data when scraping the web.
ℹ️ If you already read the article "Practical XPath for Web Scraping", you'll probably recognize more than just a few similarities, and that is because XPath expressions and CSS selectors actually are quite similar in the way they are being used in data extraction.
You probably are quite familiar with how the web works, how a web document is structured, and the hierarchy concept of HTML represented by the DOM. As that DOM will be the underlying foundation for our use of CSS selectors, let's just please take a quick second and check out what the DOM is.

The Document Object Model
Whenever you open a webpage, your browser will fetch the page's HTML code/document, however that really is just a textual representation of the document's object hierarchy/tree and the browser first has to parse it into an internal tree structure, which it can then use for all subsequent actions. That structure is called the Document Object Model.
Let's take the following demo HTML code as an example:
<!doctype html>
<html>
    <head>
        <title>What is the DOM ?</title>
        <meta charset="utf-8" />
    </head>

    <body>
        <h1>DOM 101</h1>
        <p>Webscraping is awesome !</p>
        <p>Here is my <a href="https://www.scrapingbee.com/blog/">blog</a></p>
    </body>
</html>
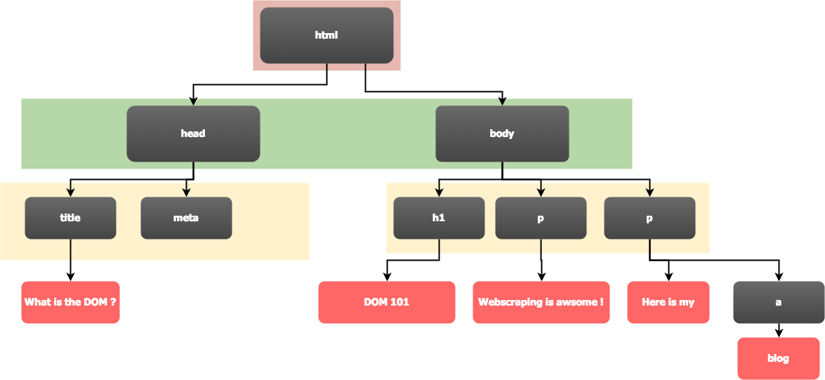
As you probably already noticed from the indentation, we have a couple of levels here. The first, and uppermost one, is <html>. That object then has two immediate child elements, <head> and <body>, which in turn have their own child elements, and so on (e.g. the second <p> child has its own <a> child).
The whole tree structure is best visualized with the following image:
If you now loaded that page into a browser and opened the browser's developer tools (press F12), you'd find the following structure under "Elements" (in Chrome) or "Inspector" (in Firefox).

What you find here, is the exact DOM tree your browser is currently using to render the page.
ℹ️ Please note, if a site uses JavaScript to modify its content, the JavaScript code may change the DOM tree at any time and it may eventually be very different from the initially sent HTML code, which you can typically access via the "View Page Source" menu.
It is important to understand the hierarchical tree nature of the DOM, as that hierarchy is one of the fundamental concepts which CSS selectors are based on.
What Is A CSS Selector?
As the name suggests, CSS selectors are closely tied to CSS - Cascading Style Sheets.
Their original purpose was to be the leading part of a CSS rule, followed by the rule's declaration block, which defined on which document elements the rule should be applied. For example, the following CSS rule would color all links on the page red.
a {
	color: red;
}
CSS is a quite powerful technology and allowed web-designers to finally separate the visual aspects (colors, fonts, positioning) from the overall document structure.
With the selector concept providing an easy way to locate arbitrary elements in any given HTML document, it was only logical to extend its use beyond CSS itself. For example, CSS selectors are at the core of JavaScript frontend development and any major JavaScript framework.
But CSS selectors are not only limited to JavaScript. The majority of languages support them either natively or via third-party libraries. More on that in just a second under CSS Selector Support In Popular Languages.
And that's where data extraction comes in. Particularly in web scraping, where locating data is one of the major tasks, CSS selectors are an essential tool and provide your code with an elegance and legibility which would be impossible if one had to manually use loops and if-statements to find the elements in question.
Let's take a look at their basic syntax, shall we?
The Basic Selector Syntax
A selector consists of one or more elements (separated by whitespace) with the last element being the actually selected one. If there's more than one element specified, any prior ones will define where in the document hierarchy our element has to be located, in order to be selected in the first place.
Let's take a simple example with a single-element selector:
a
As we provided only one element, there is no hierarchy/parent-child relation to take into account and our selector engine will simply select all elements matching the specifier, which in our example means we will get a list of all <a> tags across our entire document.
Let's step that up a notch and use two elements in the selector:
article a
Here, our selector references the two elements article and a. With a being the last element, the selector engine will - once again - return a list of <a> tags, however, unlike our previous example, we actually specified a hierarchy here. For that reason, <a> elements need to be descendants of an <article> element. If we had, for example, an <a> link under the document's main <body> tag, that link would not be selected in this example.
💡 As we did not specify a hierarchy modifier in our example, it won't matter if an
<a>tag is an immediate or non-immediate child of an<article>tag.
These two examples focus on tag names, however CSS selectors support a lot more, let's check it out.
| Selector filter | Description | Example |
|---|---|---|
| tagname | Selects elements with the indicated tag name | body |
| . | Selects elements which have the indicated HTML class assigned | .button |
| # | Selects elements with the indicated HTML ID | #login |
| > | Selects the second element, if it is an immediate child of the first element | div > p |
| + | Selects the second element, if it immediately follows the first element | div + p |
| ~ | Selects the second element, if it follows the first element (similar to + but also applies to non-immediate siblings) | div ~ p |
| [attr] | Selects elements with attributes satisfying the provided attribute filter | a[target="_blank"] |
| :pseudo ::pseudo | Pseudo-classes are prefixed with either one or two colons and provide additional filter capabilities | p:first-childp: |
| :not() | A pseudo-class filter to negate a selector filter | p:not(.myclass) |
A full reference list of selector filters can be found at https://www.w3schools.com/cssref/css_selectors.asp.
Combining selector filters
Selector filters can be combined at will. For example, check out the following selector:
body > div#myid + a.myclass[href*="example.net"]
Here we used a number of different filters at the same time:
- an attribute filter, to filter for the
hrefattribute of our<a>elements - a class filter, to select only
<a>elements with a class ofmyclass - a plus modifier, to require our
<a>tags to be immediately preceeded by a<div>element - an ID filter, to make sure that mentioned
<div>has the IDmyid - a parent filter, to require our
<div>element to be an immediate child of<body>
In this example, our selector should not match more than one element. This is because of the ID and the plus filters, we specified. IDs are supposed to be unique and as our <a> element should immediately follow that unique <div>, we should not be able to get more than one such element.
The following example should illustrate that "conundrum" pretty well.
<html>
	<body>
		<div id="myid"></div>
		<a class="myclass" href="http://example.net">WILL MATCH</a>
		<a class="myclass" href="http://example.net">WILL NOT MATCH</a>
	</body>
</html>
Selector Examples
In this part, we are going to have a look at a few CSS selector combinations, based on the following sample document.
<!DOCTYPE html>
<html>
	<head>
		<title>Document Title</title>
	</head>
	<body>
		<div>This is just a demo</div>

		<div class="myclass">A div with an HTML class</div>

		<div id="myid" class="myclass">And one more div with an HTML ID</div>

		<div id="linkdiv">
			<a href="http://example.com">First Link</a>

			<div>
				<a href="http://example.net">Second Link</a>
			</div>
		</div>
	</body>
</html>
And now let's check out the different selector examples.
| Selector | Description | Selected Elements |
|---|---|---|
title | Selects all <title> elements | <title>Document Title</title> |
div.myclass | Selects all <div> elements with the class myclass | <div class="myclass" ....<div id="myid" class="myclass".... |
div#myid | Selects a <div> element with the ID myid | <div id="myid" .... |
#linkdiv > a | Selects all <a> elements which are immediate children of an element with the ID linkdiv | <a href="http://example.com">First Link</a> |
div > a | Selects all <a> elements which are immediate children of a <div> element | <a href="http://example.com">First Link</a><a href="http://example.net">Second Link</a> |
div#linkdiv > a[href*="example.net"] | Selects all <a> elements which are immediate children of a <div> element with the ID linkdiv, and which have example.net in their link | None, because there is no immediate child |
div#linkdiv a[href*="example.com"] | Selects all <a> elements which are desecendants of a <div> element with the ID linkdiv, and which have example.com in their link | <a href="http://example.com">First Link</a> |
As evident from these examples, CSS selectors come with a quite concise syntax, but still provide - with their different class types, modifiers, and attribute filters - a rather powerful approach to access/select any element within an HTML tree.
How To Get A Selector With The Browser Inspector
As so often, your browser's developer tools are your best friend on this adventure. Open any web page, right-click the element in question, and pick Inspect from the context menu.
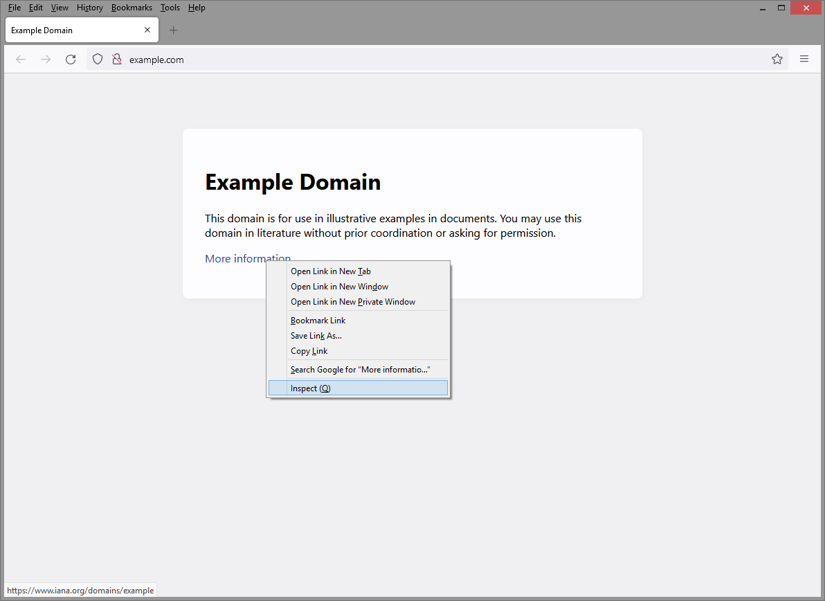
Clicking Inspect should now have automatically opened the dev-tools pane with the Elements/Inspector tab and the selected element should be highlighted. If you need to make some adjustments to the selection, you can simply navigate in the DOM tree and refine the selection. Once you found the right element, right-click it to open its context menu and choose Copy - CSS Selector (the menu entry may vary from browser to browser).
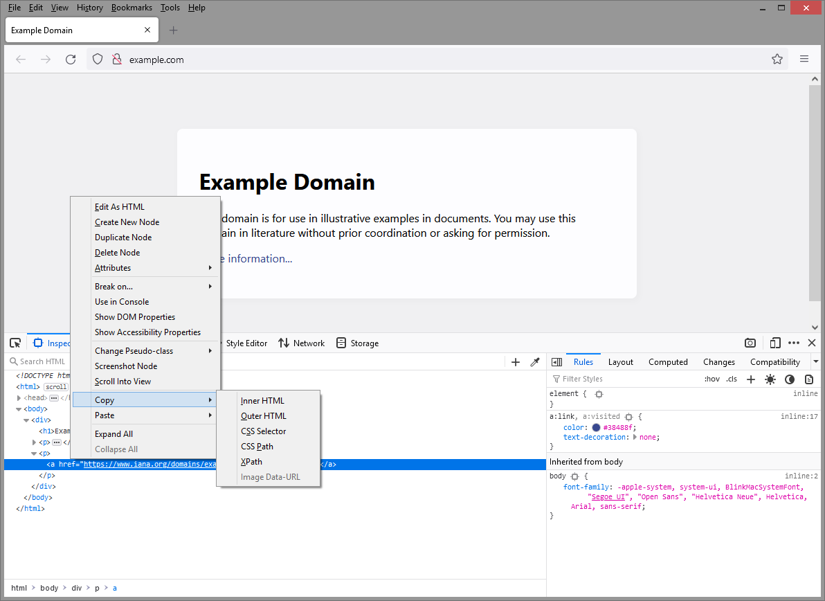
You should now have a basic CSS selector for this particular element in your clipboard. While that should work fine, it's won't be necessarily the most optimized selector expression and may not work any more after a page reload or on a different page altogether.
So let's quickly have a look at the optimization opportunities we have in this context.
Optimizing the selector
Twitter has a rather complex page layout and HTML structure, so let's take for our example ScrapingBee's tweet where we announced a new JavaScript feature.
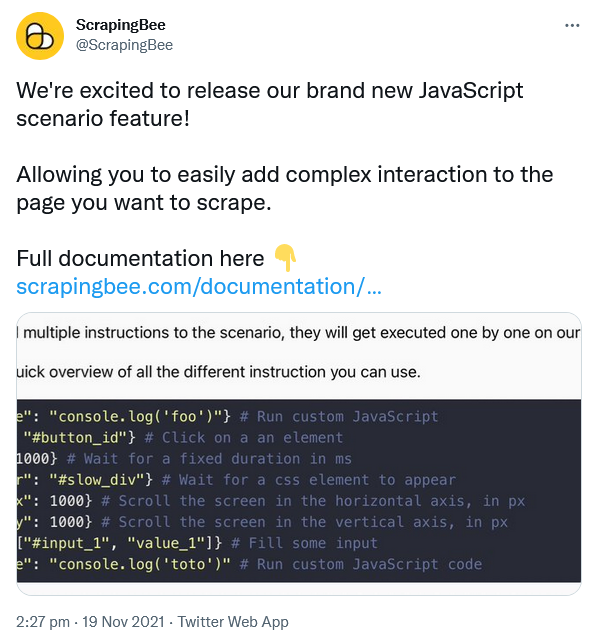
If we now wanted to extract the tweet's text, we could proceed as we described earlier, right-click the text element, and copy the CSS path. Unfortunately, that would get us the following
html body div#react-root div.css-1dbjc4n.r-13awgt0.r-12vffkv div.css-1dbjc4n.r-13awgt0.r-12vffkv div.css-1dbjc4n.r-18u37iz.r-13qz1uu.r-417010 main.css-1dbjc4n.r-1habvwh.r-16y2uox.r-1wbh5a2 div.css-1dbjc4n.r-150rngu.r-16y2uox.r-1wbh5a2.r-rthrr5 div.css-1dbjc4n.r-aqfbo4.r-16y2uox div.css-1dbjc4n.r-1oszu61.r-1niwhzg.r-18u37iz.r-16y2uox.r-1wtj0ep.r-2llsf.r-13qz1uu div.css-1dbjc4n.r-14lw9ot.r-jxzhtn.r-1ljd8xs.r-13l2t4g.r-1phboty.r-1jgb5lz.r-11wrixw.r-61z16t.r-1ye8kvj.r-13qz1uu.r-184en5c div.css-1dbjc4n section.css-1dbjc4n div.css-1dbjc4n div div div.css-1dbjc4n.r-j5o65s.r-qklmqi.r-1adg3ll.r-1ny4l3l div.css-1dbjc4n div.css-1dbjc4n article.css-1dbjc4n.r-18u37iz.r-1ny4l3l.r-1udh08x.r-1qhn6m8.r-i023vh div.css-1dbjc4n.r-eqz5dr.r-16y2uox.r-1wbh5a2 div.css-1dbjc4n.r-16y2uox.r-1wbh5a2.r-1ny4l3l div.css-1dbjc4n div.css-1dbjc4n div.css-1dbjc4n div.css-1dbjc4n.r-1s2bzr4 div#id__aosk0ke7vca.css-901oao.r-18jsvk2.r-37j5jr.r-1blvdjr.r-16dba41.r-vrz42v.r-bcqeeo.r-bnwqim.r-qvutc0
Not very self-explanatory nor a very stable selector by the looks.
Well, what about the HTML IDs Twitter is using? They are always helpful, aren't they? And yes, there are actually a few, but unfortunately that won't get us much further in this case either, as Twitter randomizes these IDs on each page load. So even if we use an ID, it won't work with the next request for that page, let alone any other tweet. However, please do not fret, rescue is on the way. 😌
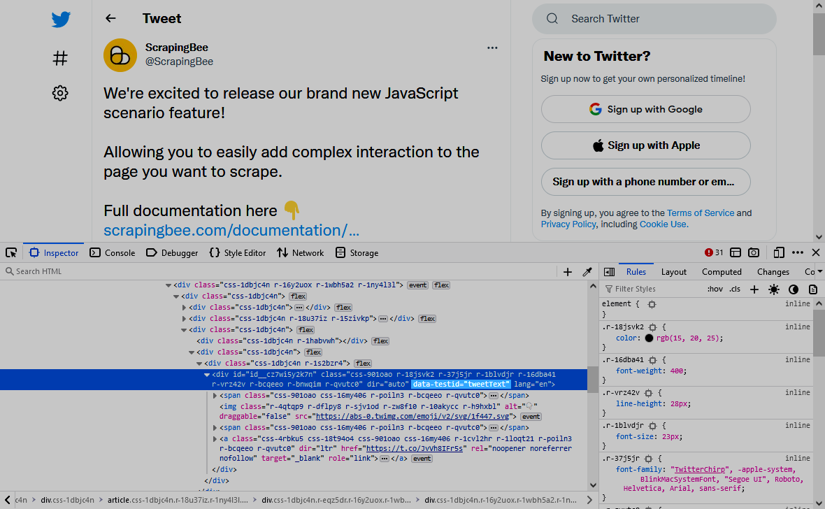
Did you notice that one, single, innocent data-testid attribute? That's going to be our key here. We are simply going to use the following selector to locate the tweet's text content.
div[data-testid="tweetText"]
Voilà, this works on our current page, when we reload, and even for any other tweet. Well done, my friends 🎉
ℹ️ In all fairness, this selector is working beautifully as of the time this article was written. Twitter does have the habit of shifting layouts around and that may mean this attribute might get dropped at some point.
How much the browser's default CSS selector can help you, typically really depends on how the designer structured the site and named the elements. If it is a clean structure with proper IDs and classes, the default selector may just work out of the box. Otherwise, you may need to check the document for additional hints.
Usually you'd want to look out for IDs which are not changing or appropriate HTML classes. Any other element attributes (e.g. data-testid in our example) may also be of further assistance in narrowing down the selected elements.
Sometimes even an element's text content may provide the necessary clue. While the selector standard does not yet support content filters yet (i.e. browsers do not handle it yet), there still is already support for the :contains() pseudo-class in most server-side libraries.
For example, Twitter currently uses 2:27 pm · 19 Nov 2021 as date format. What could we use here? Yep, you are absolutely right, · could serve as a flag here. And in fact, the following selector will give us exactly one element, the date one.
span:contains( · )
Note: as mentioned, this will unfortunately not yet work in browsers, but server-side libraries should handle it all right.
Trying CSS Selectors In The Browser
Once you have found your ideal selector, you can easily check in your browser if it will find the right element(s).
Again, the developers tools will fully support you on this endeavour and there are actually two different ways to verify a CSS selector in the browser.
- By searching the DOM
- By running JavaScript in the console
Searching the DOM with CSS selectors
Simply press F12 to open the developer tools and select the "Elements"/"Inspector" tab.
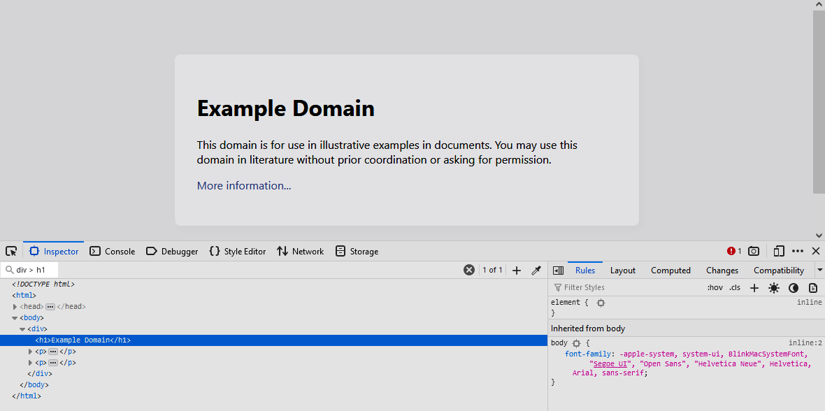
As mentioned under The Document Object Model, you should now have the site's DOM in front of you and can press Ctrl/⌘ + F to open the search field, where you can enter your CSS selector. All you now need to do is press Enter and the developer tools will iterate over all elements which match our selector. That was easy peasy, right? 🥳
For example, if you head over to http://example.com and search for div > h1 (selecting an <h1>, which is an immediate child of a <div>), you should get the following output.
Using JavaScript in the dev-tools console
Another (more programmer-like) approach would be to use JavaScript and document.querySelector directly in your browser console.
For that, pop open your developer tools (again, F12) and select "Console" this time. Now, going by our previous http://example.com example, you can simply type
document.querySelector('div > h1');
This will return exactly one element, the site's H1 tag. Should you want to get all matching elements, then you'd use document.querySelectorAll instead.
CSS Selector Support In Popular Languages
Python
A rather popular library for handling CSS selectors in Python is Beautiful Soup. Its select() method allows you to simply pass your CSS selector and get all the matching elements as list.
At ScrapingBee we are really fond of Python, which is why even have a dedicated Beautiful Soup tutorial. Check it out at BeautifulSoup tutorial: Scraping web pages with Python.
JavaScript
With JavaScript and CSS, both, being intrinsic parts of the web, it is not too surprising, that JavaScript comes with native support for CSS selectors. Admittedly, particularly on the browser side.
With querySelector and querySelectorAll, CSS selectors have been natively supported on the client-side since 2008 already. Run the following command in your browser console and your page's background will change into a beautiful shade of sunrise 🌅.
document.querySelector('body').style.background = '#fbb84f'
The moment we leave the world of browsers, support becomes a tad less "native", because we typically do not have a document object, but that does not mean we can't use CSS selectors any more. There are literally hundreds of CSS selector engines available, of which each will have its advantages and quirks to take into account.
One library, which left quite a good impression with us is cheerio, for which actually have its own article.
Java / Groovy / Kotlin
Of course, the whole JVM landscape is equally well versed in the world of CSS selectors. The following libraries have proven to work exceptionally well for that use case:
Particularly with Jerry, running a CSS selector against an HTML document can really be a one-liner.
Jerry.of("<html><div id='jodd'><b>Hello</b> Jerry</div></html>").s("div#jodd b")
PHP, C#, Go, and more
Similar to JavaScript, PHP also has a myriad of CSS selector engines available. There's also Web Scraper Toolkit, which does not only provide a selector engine but provide a full-fledged scraper library.
While not offering as many libraries as PHP or JavaScript, you'll still find quite a bit for C# and .NET in general. Most notably here would be the Html Agility Pack and its Fizzler extension.
Should Go be your choice of language, you'll also equally find a fine selection of selector engines in its package repository.
Last but not least, Perl might not have always been the first choice for the web (though, who still remembers /cgi-bin/myscript.cgi in pure, 💯 Perl?) but it still has its own selector engine at https://metacpan.org/dist/CSS.
Overall, there are too many languages to list them all here, but you'll be able to find an appropriate HTML parser and CSS selector engine for most languages.
As for the four platforms we mentioned here, you may find the following posts interesting, as they cover all the details on how to crawl and scrape in PHP, .NET, Go, and Perl in detail.
Comparing CSS Selectors To XPath Expressions
We already briefly mentioned it in the introduction of this posting, CSS selectors and XPath expressions are pretty similar technologies.
While their origins are a bit different, with XPath being designed as query language for XML and CSS selectors coming straight from a web background, their overall goal still is the same - to access and locate given elements in an XML/HTML document.
To be fair, there still are a few areas where CSS selectors need to catch up with XPath expressions, with a prime example being the bi-directional traversal of the document tree. With an XPath expression, you can easily select an element's parent (i.e. //span/..), whereas that is still not possible under the current CSS selector standard.
If you want a deep down comparison between the two methods, you can check out our detailed guide on XPath vs CSS selectors
Conclusion
After all these examples, we can probably safely say CSS selectors provide a very elegant and concise way to locate elements on a web page and help our scraper find all the data it needs to successfully extract the required information from a page.
While there are still a few features missing (e.g. referencing parent elements), CSS selectors overall really are a full-fledged tool for most scraping tasks and, particularly, their standardized support across many languages makes them an attractive choice.
Naturally, at ScrapingBee, they are also natively supported on our data extraction platform and you can simply pass your CSS selectors to the API and ScrapingBee does all the rest.
💡 Did you know? ScrapingBee.com offers a trial with 1,000 API request completely for free.
If you have any further questions on this topic or how ScrapingBee can help you with any of your data extraction jobs, please do not hesitate a second to reach out to us. We are happy to help in all your crawling and scraping related endeavours.
Happy selecting and happy scraping!

Alexander is a software engineer and technical writer with a passion for everything network related.


