Idealista is a very famous listing website that lists millions of properties for sale and/or rent. It is available in Spain, Portugal, and Italy. Such property listing websites are among the best ways to do market research, analyze market trends, and find a suitable place to buy. In this article, you will learn how to scrape data from idealista. The website uses anti-web scraping techniques and you will learn how to circumvent them as well.
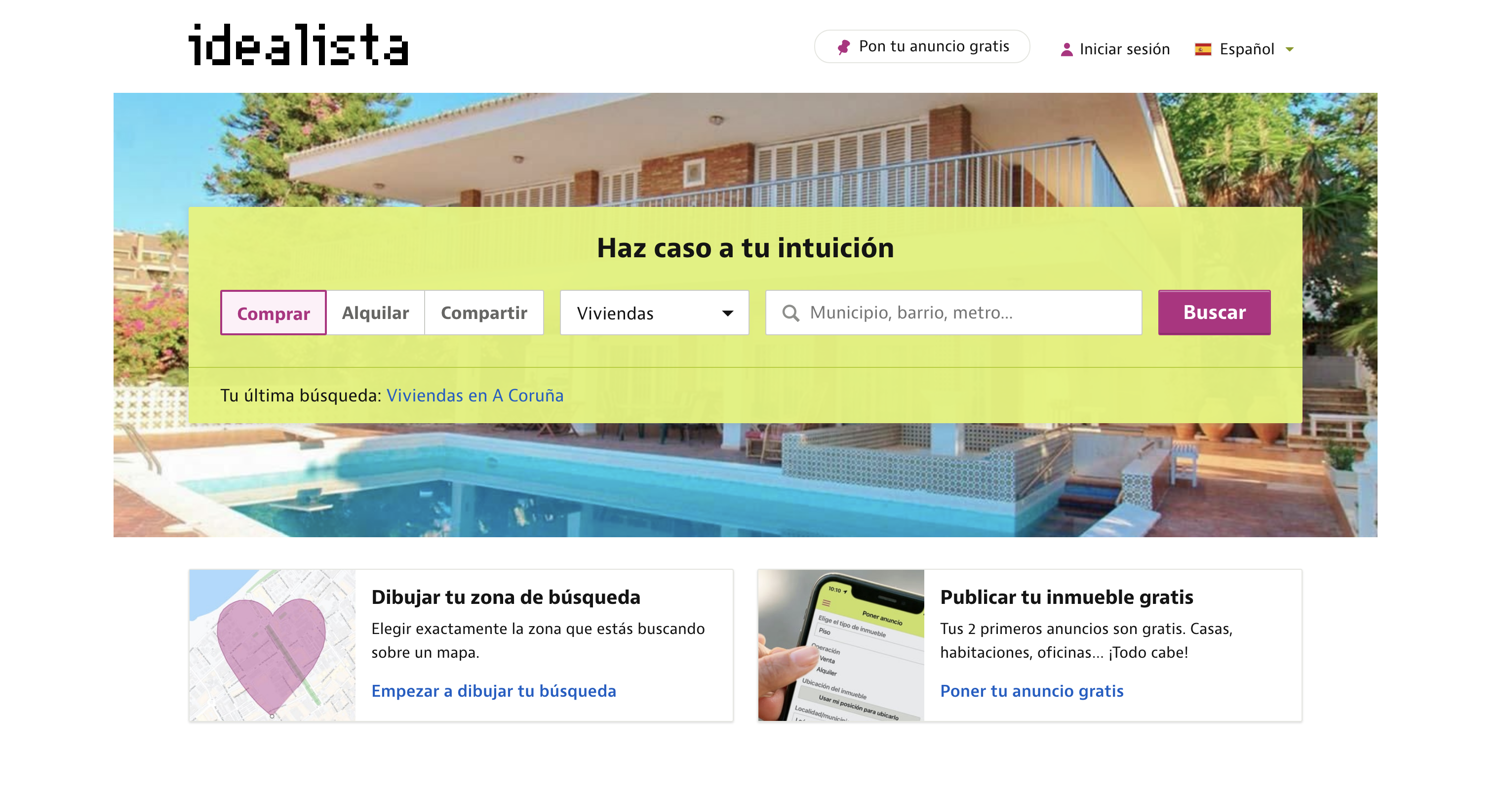
This tutorial will focus on the Spanish offering of idealista. You can go to the homepage via this URL.
💡Interested in scraping Real Estate data? Check out our guide on How to scrape Zillow with Python

Setting up the prerequisites
This tutorial will use Python 3.10.0 but it should work with most of the recent Python versions. Start by creating a separate directory for this project and create a new Python file within it:
$ mkdir idealista_scraper
$ cd idealista_scraper
$ touch app.py
You will need to install the following libraries to continue:
You can install both of these via the following PIP command:
$ pip install selenium undetected-chromedriver
Selenium will provide you with all the APIs to programmatically control a web browser and undetected-chromedriver patches Selenium Chromedriver to make sure the website does not know you are using Selenium to access the website. This will help in evading the bot detection mechanism used by the website.
Fetching idealista homepage
Let's fetch the idealista homepage using undetected-chromedriver and selenium:
import undetected_chromedriver as uc

driver = uc.Chrome(use_subprocess=True)
driver.get("https://www.idealista.com/")
Save this code in app.py and run it. It should open up a Chrome window and navigate it to idealista homepage. I like to run the code snippets in a Python shell to quickly iterate on ideas and then save the final code to a file. You can follow the same pattern for this tutorial.
Deciding what to scrape
It is very important to have a clear idea of what you want to scrape before diving deeper into the website structure. This tutorial will focus on extracting property listings (for sale) for all municipalities in all provinces. The final output of the scraper will be similar to this:
{
    "A Coruña": {
        "url": "https://www.idealista.com/venta-viviendas/a-coruna-provincia/municipios",
        "municipalities": {
            "A Baña": {
                "url": "https://www.idealista.com/venta-viviendas/a-bana-a-coruna/",
                "properties": [
                    {
                        "title": "Casa o chalet independiente en o cruceiro, s/n, A Baña",
                        "url": "https://www.idealista.com/inmueble/93371668/",
                        "price": "140.000€",
                        "detail": "2 hab. 60 m²",
                        "description": "Independent house of about 60 square meters and a garden of 1050 square meters. In the place or ordoeste cruceiro, A bathe, near the..."
                    },
                    # ... additional properties ...
                ],
            },
            # ... additional municipalities ...
        },
    },
    # ... additional provinces ...
}
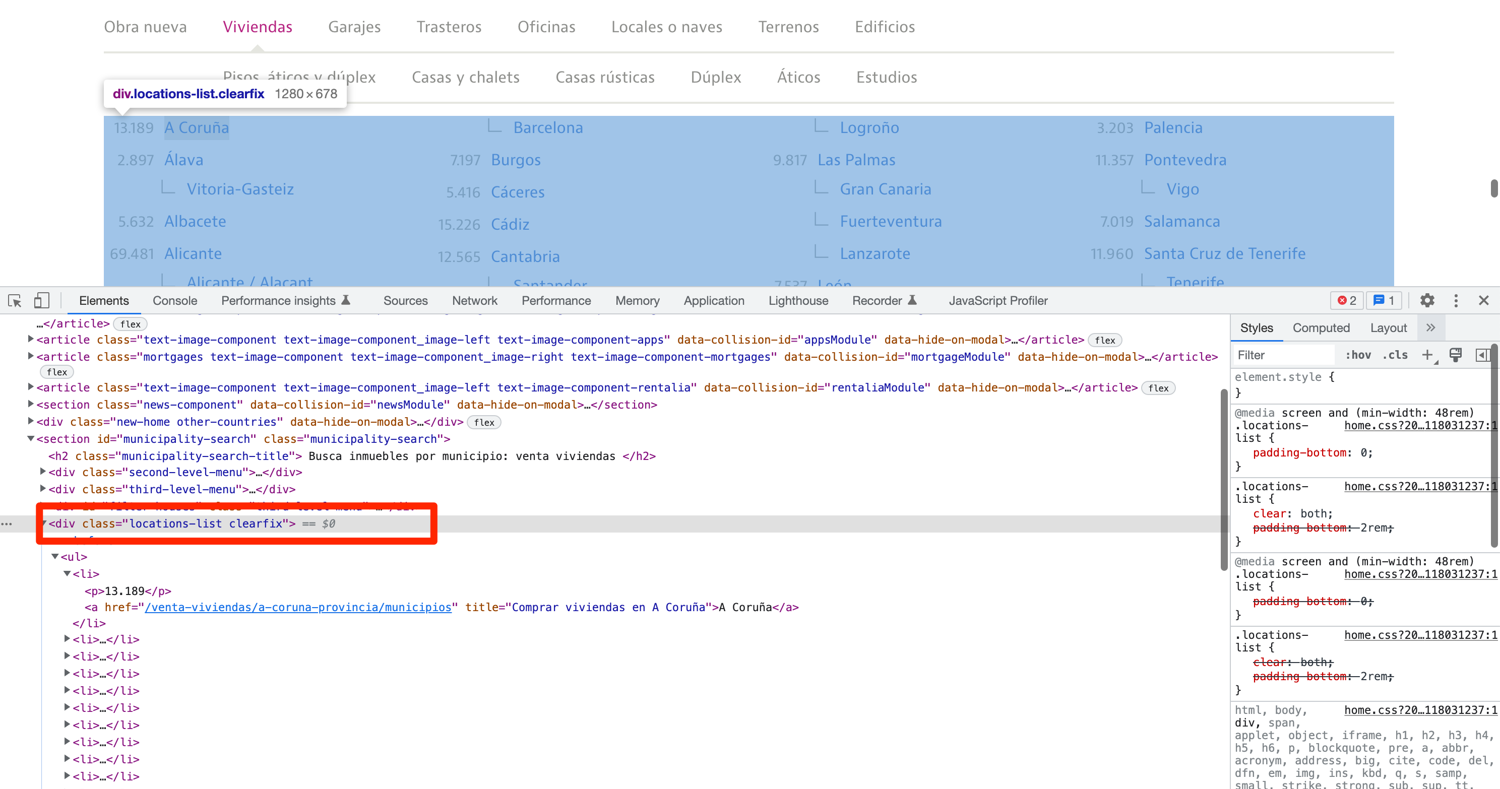
The provinces are all listed on the homepage. Scroll down to the end and you will see a listing:
Clicking on either of these provinces will lead you to the municipalities page:

And clicking on either of these municipalities will take you to the property listing page:
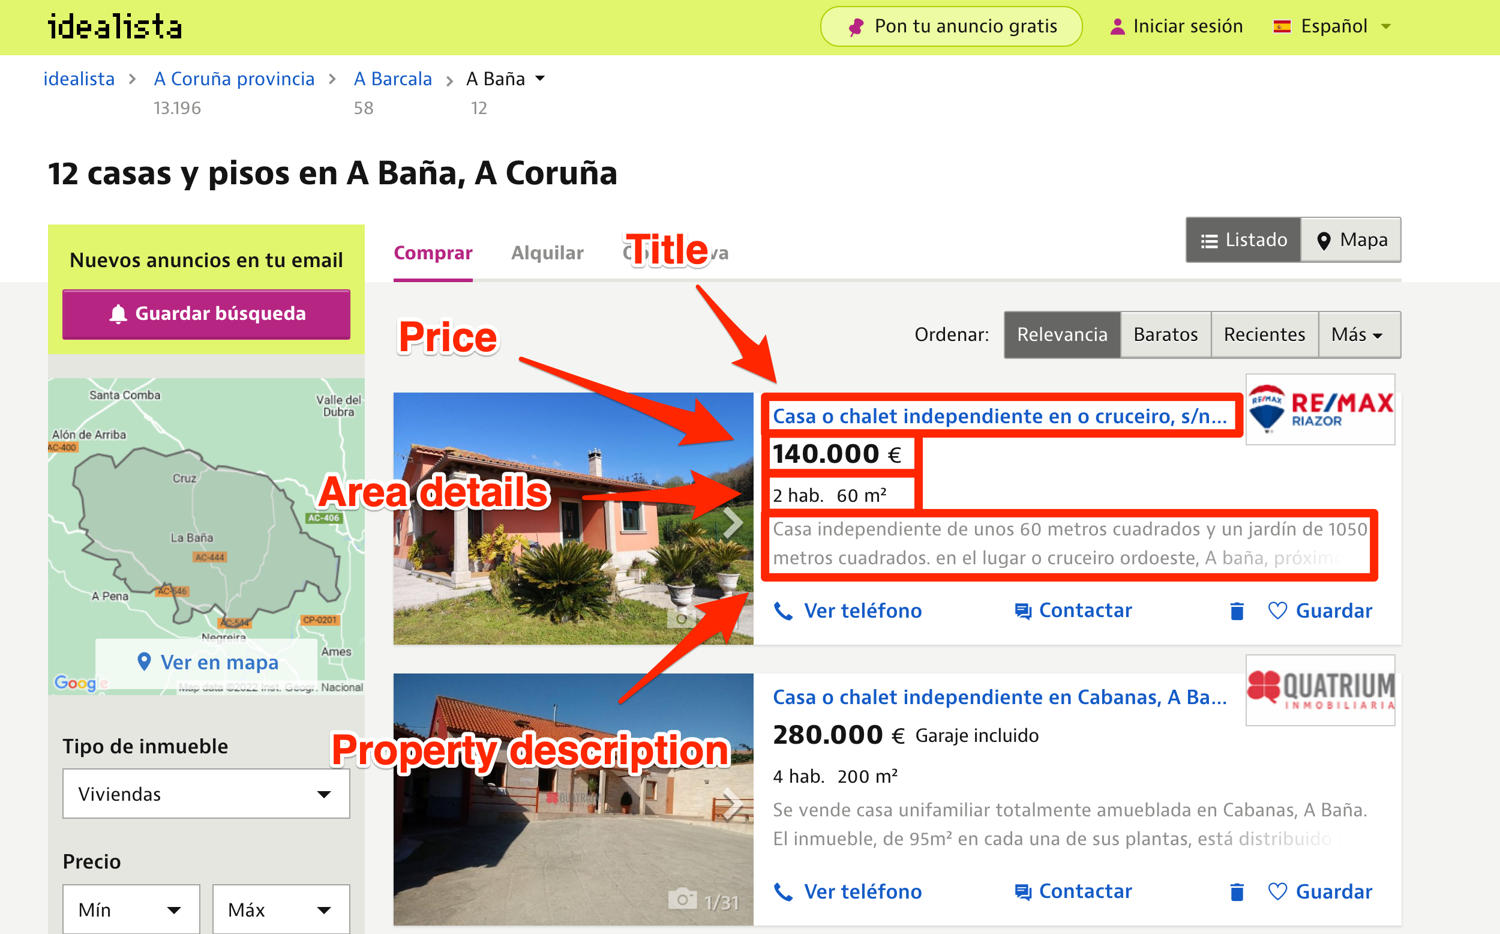
You will be scraping the following information for each property listing:
- title
- price
- area details
- property description
- property URL
Below you can see an annotated properties listing page showcasing where all of the information for each property is located.

Scraping the list of provinces
You will be using the default methods (find_element + find_elements) that Selenium provides for accessing DOM elements and extracting data from them. Additionally, you will be relying on CSS selectors and XPath for locating the DOM elements. The exact method you use for locating an element will depend on the DOM structure and which method is the most appropriate.
Before you can start writing extraction code, you need to spend some time exploring the HTML structure of the page. You can do that by opening up the homepage in Chrome, right-clicking any province, and selecting Inspect. This will open up the developer tools panel and you can click around to figure out which tag encapsulates the required information. This is one of the most common workflows used in web scraping.
As you can see in the picture below, the provinces are all nested inside a div with the class of locations-list.

You can make use of this knowledge along with CLASS_NAME and XPATH selectors to extract the whole div containing the provinces and then extract all the anchor tags from that div. This will leave you with links to all the individual province pages. The code below demonstrates how to do it. Keep in mind that this is just one way to extract this information. You can also write just a single XPATH expression to do the same thing.
# ...

results = {}

def extract_provinces():
    driver.get("https://www.idealista.com/")
    provinces_div = driver.find_element(By.CLASS_NAME, 'locations-list')
    provinces = provinces_div.find_elements(By.XPATH, './/a')
    for province in provinces:
        results[province.text] = {
            "url": province.get_attribute('href'),
            "municipalities": {}
        }

if __name__ == "__main__":
    extract_provinces()
    print(results)
You should separate chunks of code into individual functions. This will help in modularizing the code and making sure you are not repeating yourself. The code above navigates to the homepage of idealista and then extracts the provinces_div by targeting the element with the class of locations-list. Then it extracts all the anchor tags from that div. .//a makes sure that only the anchor tags that are nested inside the provinces_div are returned. Afterward, the code loops over all the anchor tags (provinces) and uses the province name as a key and assigns a dict containing the url for that province and an empty municipalities dict as its value.
The last part of the code just runs the extract_provinces function and prints the value of the results dict in the terminal.
Scraping the list of municipalities
Now that you have a dict containing all the provinces and their respective URLs, you can loop over them and go to each province page and extract the list of municipalities.
# ...

if __name__ == "__main__":
    extract_provinces()
    for province in results.keys():
        extract_municipalities(province, results[province]['url'])
Explore the HTML structure of the province page first before writing the extract_municipalities function. Repeat the same procedure as before: open up developer tools and figure out the best strategy to extract all the relevant anchor tags.
As you can see in the screenshot below, the list of municipalities is encapsulated inside a ul with the id of location_list. If you can extract this ul then you can easily extract all the anchor tags within it.

Unlike before, let's make use of a single XPath query to extract all nested anchor tags from the ul:
def extract_municipalities(province, url):
    driver.get(url)
    municipalities = driver.find_elements(By.XPATH, '//ul[@id="location_list"]//a')
    results[province]['municipalities'] = {}
    for municipality in municipalities:
        results[province]['municipalities'][municipality.text] = {
            "url": municipality.get_attribute('href'),
            "properties": [],
        }
        print(municipality.text)
The code above navigates the Chrome window to the province page and extracts anchor tags using the XPATH locator strategy. //ul[@id="location_list"]//a tells selenium to extract all ul tags with the id of location_list and extract all nested a tags from within it. Finally, it uses the municipality name as the key and assigns a dict containing municipality URL and properties list to it.
Scraping individual property data
The next step is to extract the individual property data from the properties listing page for each municipality. You already have a URL for each municipality. Just loop over the keys in the dict and ask Selenium to navigate to each municipality's property listing page.
# ...

if __name__ == "__main__":
    extract_provinces()
    for province in results.keys():
        extract_municipalities(province, results[province]['url'])
        for municipality in results[province]['municipalities'].keys():
            municipality_properties = extract_properties(results[province]['municipalities'][municipality]['url'])
            results[province]['municipalities'][municipality]['properties'] = municipality_properties
Let's explore the HTML structure of the page once again before writing the extract_properties function.
As you can observe in the image below, each listing is encapsulated in an article tag. Some adverts are encapsulated in an article tag as well. However, you can filter those out based on class names as only the property listings have a class of item.

I always find it easy to extract the property "blocks" and then extract the individual property details from within the blocks:
def extract_properties(url):
    driver.get(url)
    property_divs = driver.find_elements(By.XPATH, "//article[contains(@class, 'item')]")
    properties = []
    for div in property_divs:
        # process the divs
    return properties
note: //article[contains(@class, 'item')] is different from //article[@class='item']. The former matches all article tags that contain the item class and the latter matches all article tags that have only a single class of item.
Go ahead and explore the HTML structure of the rest of the data you want to extract.
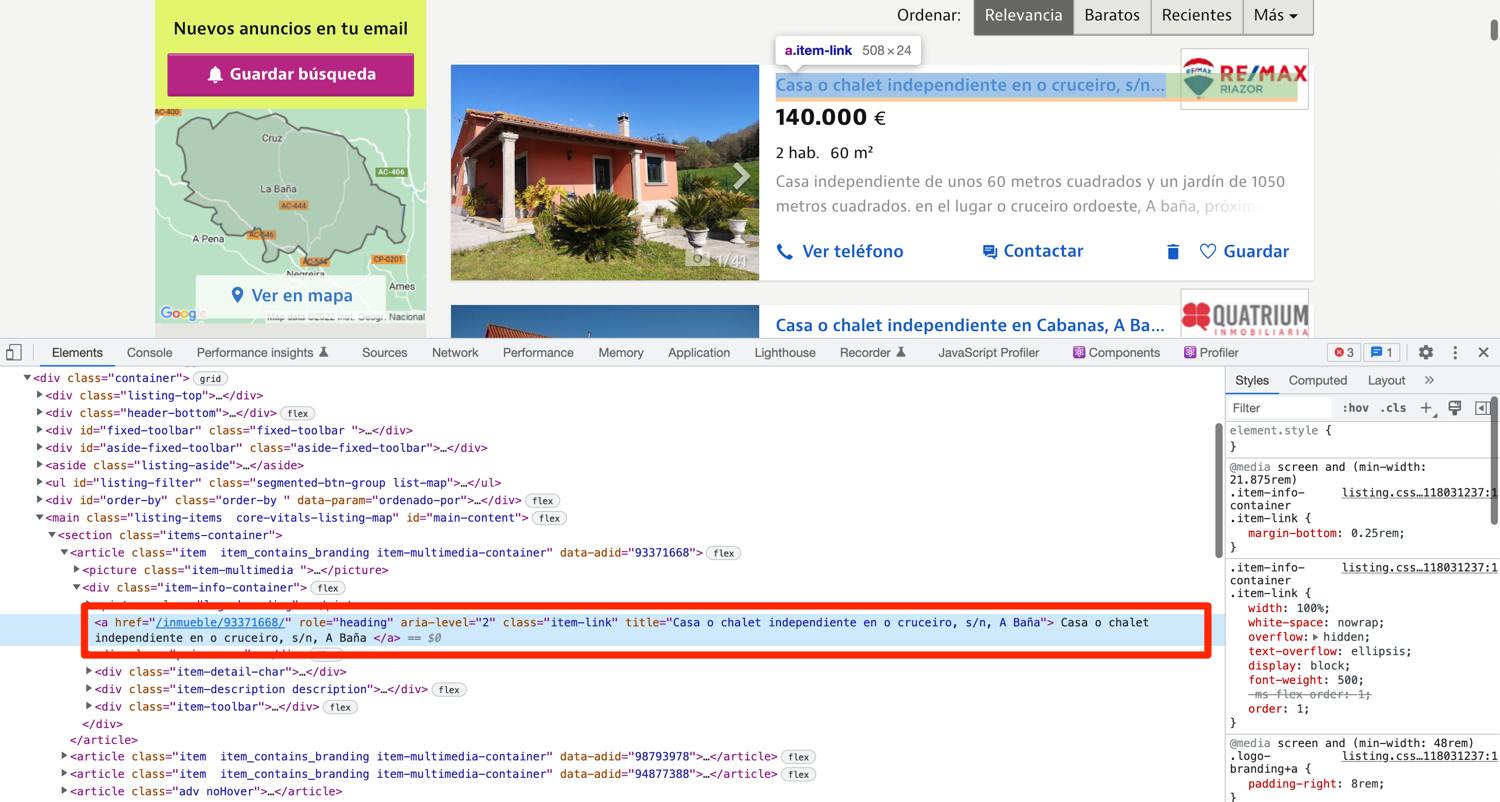
The title for the listing is located inside an anchor tag with the class of item-link:
def extract_properties(url):
    driver.get(url)
    property_divs = driver.find_elements(By.XPATH, "//article[contains(@class, 'item')]")
    properties = []
    for div in property_divs:
        property = {}
        property['title'] = div.find_element(By.XPATH, './/a[@class="item-link"]').text
        property['url'] = div.find_element(By.XPATH, './/a[@class="item-link"]').get_attribute('href')
        properties.append(property)
    return properties
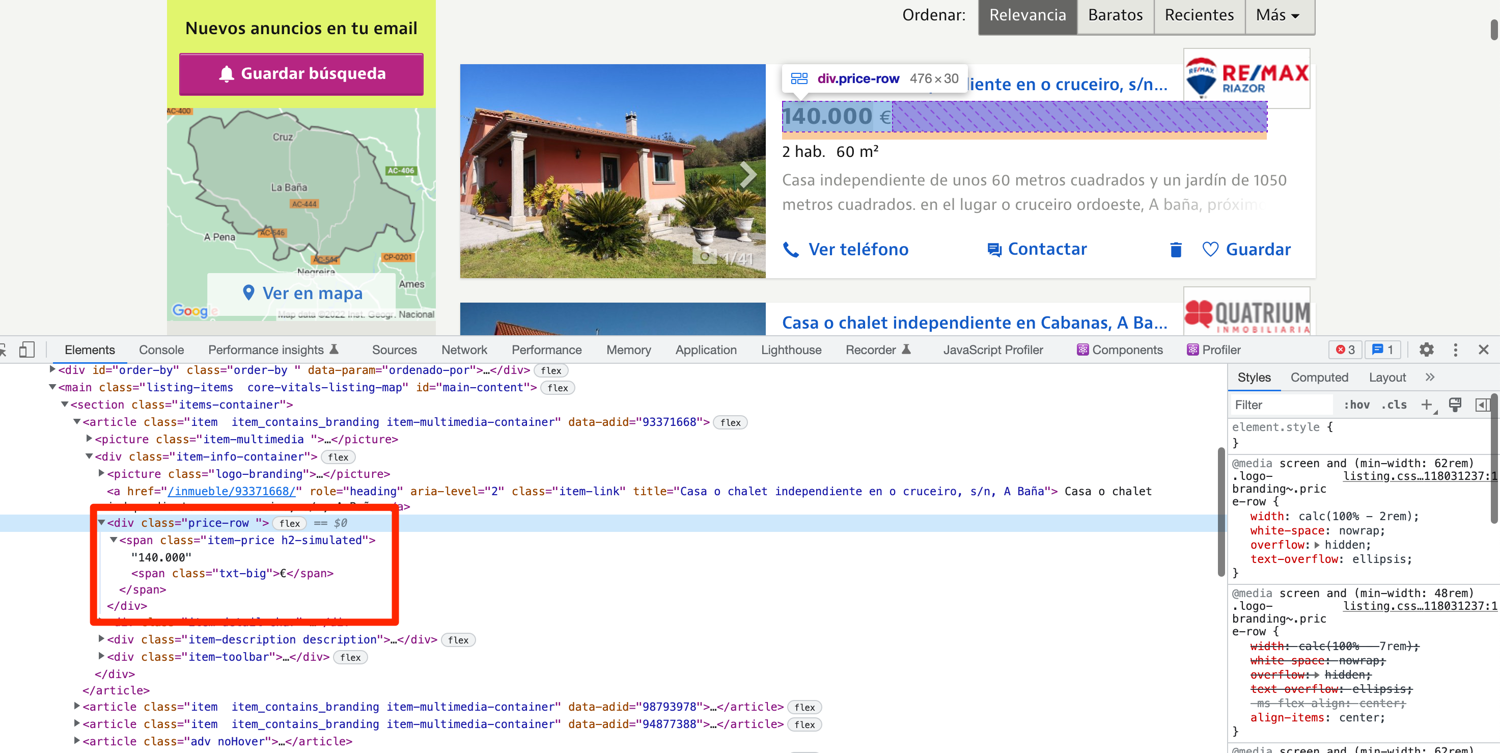
The price of the property is located inside a div with the class of price-row. You can use XPath to extract the div and then use the .text attribute to extract all the visible text from the div. This will leave you with the price and currency.
def extract_properties(url):
    driver.get(url)
    property_divs = driver.find_elements(By.XPATH, "//article[contains(@class, 'item')]")
    properties = []
    for div in property_divs:
        property = {}
        property['title'] = div.find_element(By.XPATH, './/a[@class="item-link"]').text
        property['url'] = div.find_element(By.XPATH, './/a[@class="item-link"]').get_attribute('href')
        property['price'] = div.find_element(By.XPATH, './/div[contains(@class, "price-row")]').text
        properties.append(property)
    return properties
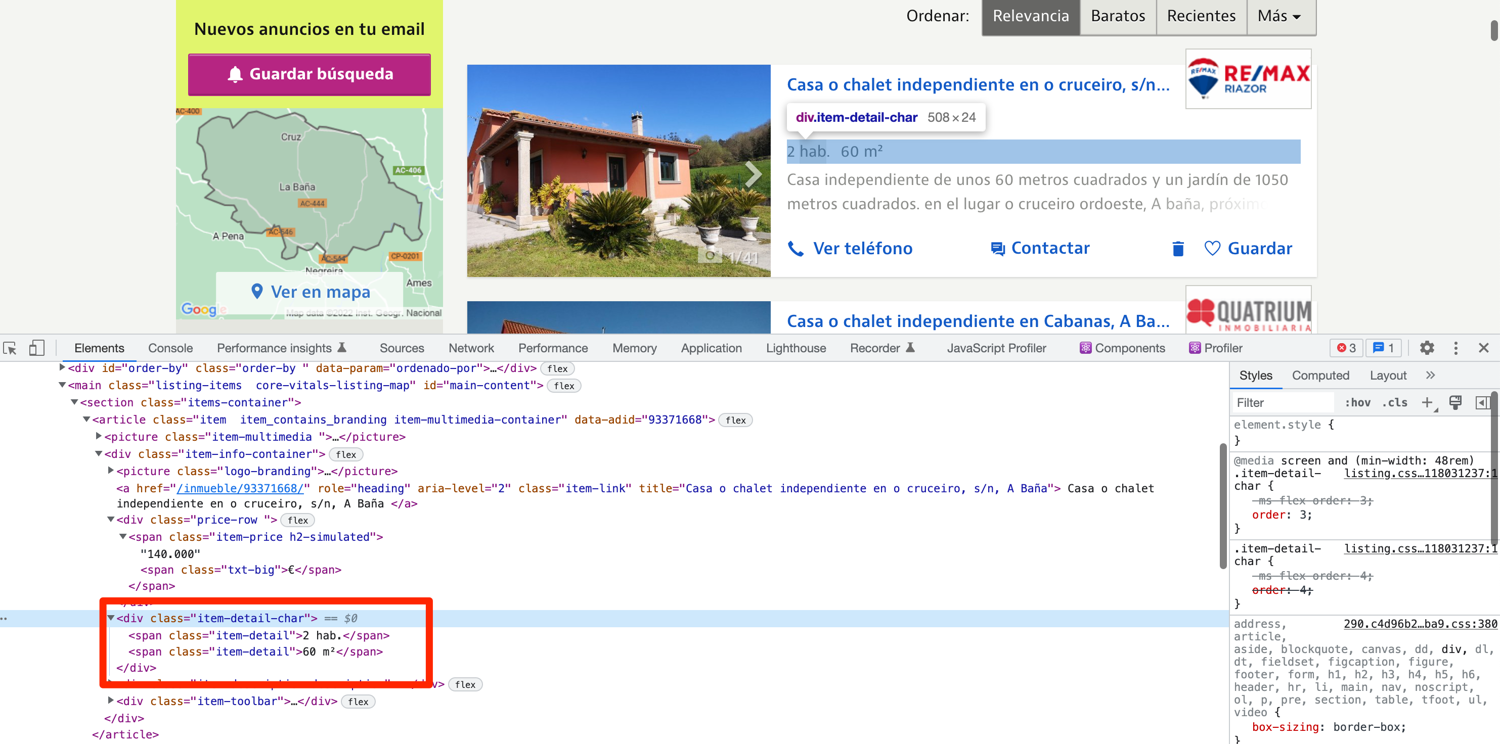
The property details are nested inside a div with the class item-detail-char. You can extract the details using XPath and the .text attribute yet again.
def extract_properties(url):
    driver.get(url)
    property_divs = driver.find_elements(By.XPATH, "//article[contains(@class, 'item')]")
    properties = []
    for div in property_divs:
        property = {}
        property['title'] = div.find_element(By.XPATH, './/a[@class="item-link"]').text
        property['url'] = div.find_element(By.XPATH, './/a[@class="item-link"]').get_attribute('href')
        property['price'] = div.find_element(By.XPATH, './/div[contains(@class, "price-row")]').text
        property['detail'] = div.find_element(By.XPATH, './/div[@class="item-detail-char"]').text
        properties.append(property)
    return properties
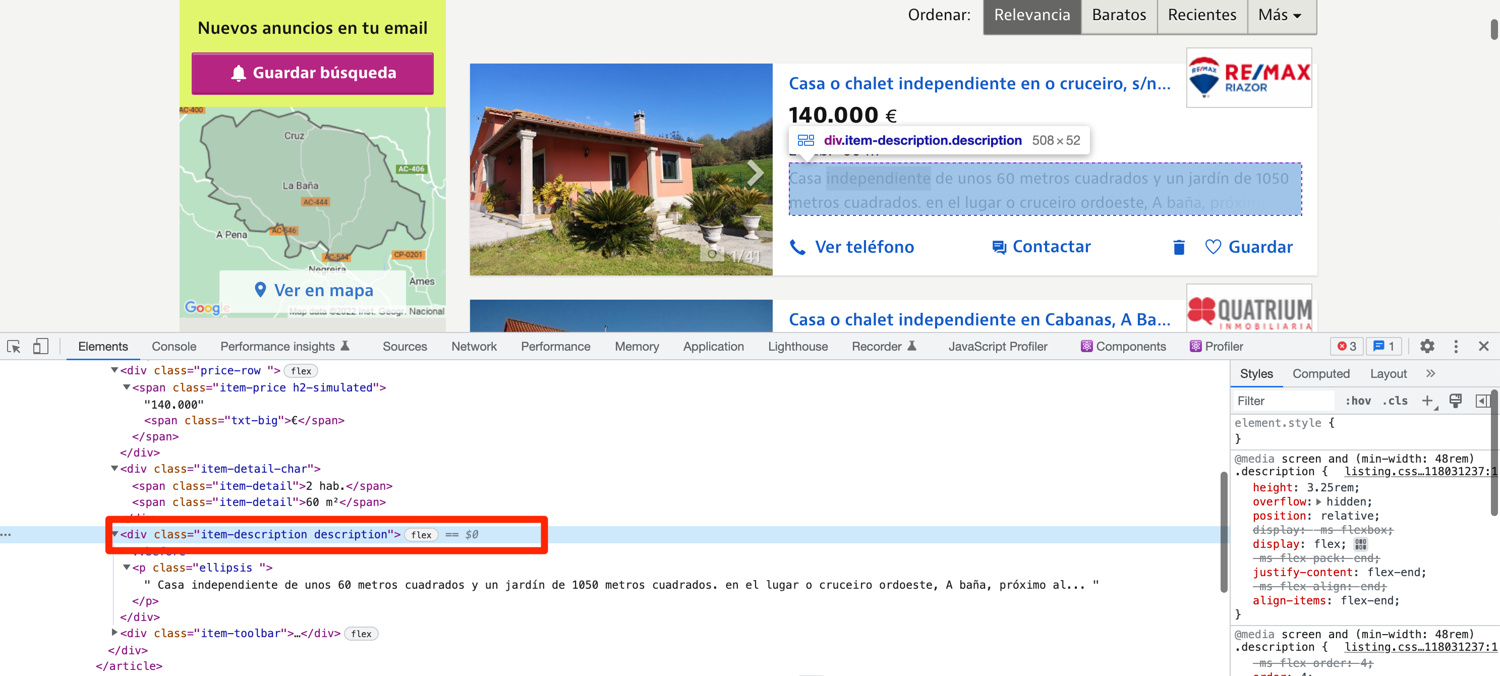
Short property description blurbs are nested within a div with the class of item-description. This is not the complete property description and is truncated for display on the listings page. The complete description is located on the individual property page but we will be focusing only on this short blurb in this tutorial.
def extract_properties(url):
    driver.get(url)
    property_divs = driver.find_elements(By.XPATH, "//article[contains(@class, 'item')]")
    properties = []
    for div in property_divs:
        property = {}
        property['title'] = div.find_element(By.XPATH, './/a[@class="item-link"]').text
        property['url'] = div.find_element(By.XPATH, './/a[@class="item-link"]').get_attribute('href')
        property['price'] = div.find_element(By.XPATH, './/div[contains(@class, "price-row")]').text
        property['detail'] = div.find_element(By.XPATH, './/div[@class="item-detail-char"]').text
        property['description'] = div.find_element(By.XPATH, './/div[contains(@class, "item-description")]').text
        properties.append(property)
    return properties
Following pagination on property listing pages
Some municipalities contain thousands of listings. Idealista splits the listings across multiple pages and provides convenient pagination options at the bottom of the page.

You can easily scrape all the property listings from an individual municipality by following these pagination links. You can make your job easier by relying on the "Siguiente" link. It translates to "next" and is only present on the page when there is a next page available. To make it a bit clear, compare the above picture with the picture below where we are at the very last listing page.

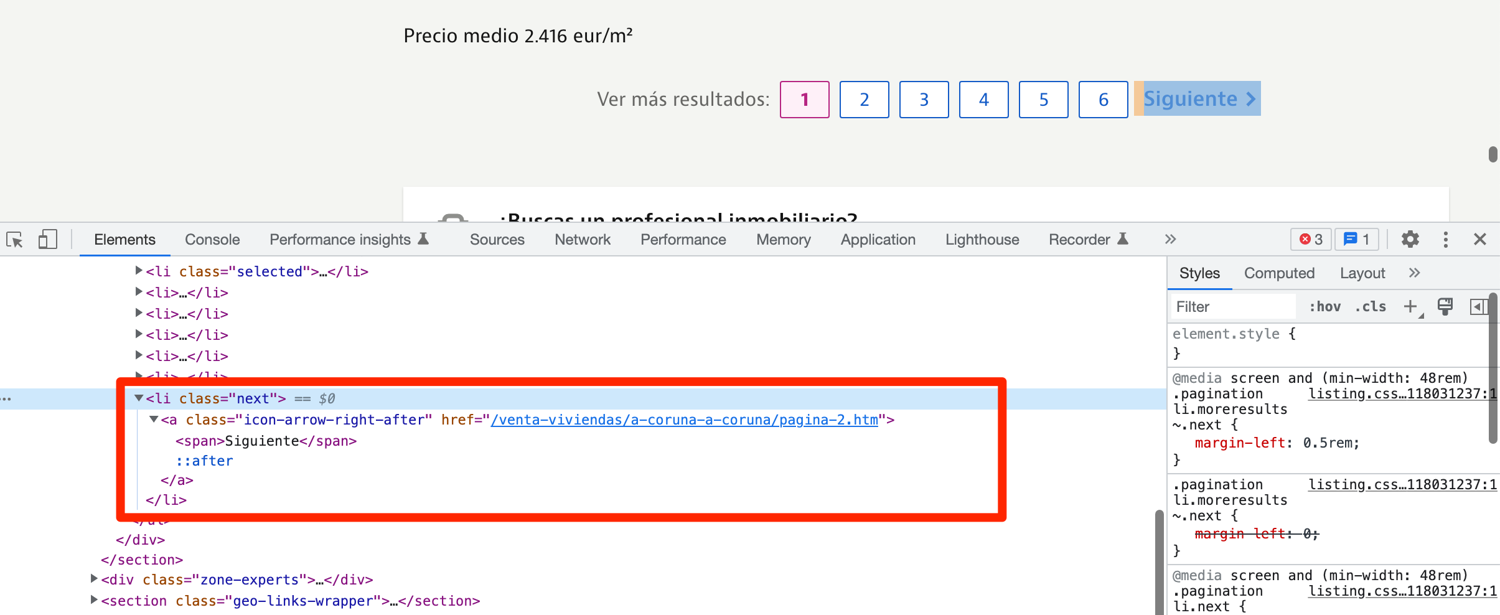
If you explore the HTML structure, you will observe that the next button is nested in an li tag with the class of next.
You can modify the extract_properties function to make use of pagination:
def extract_properties(url):
    driver.get(url)
    property_divs = driver.find_elements(By.XPATH, "//article[contains(@class, 'item')]")
    properties = []
    for div in property_divs:
        property = {}
        property['title'] = div.find_element(By.XPATH, './/a[@class="item-link"]').text
        property['url'] = div.find_element(By.XPATH, './/a[@class="item-link"]').get_attribute('href')
        property['price'] = div.find_element(By.XPATH, './/div[contains(@class, "price-row")]').text
        property['detail'] = div.find_element(By.XPATH, './/div[@class="item-detail-char"]').text
        property['description'] = div.find_element(By.XPATH, './/div[contains(@class, "item-description")]').text
        properties.append(property)
    if driver.find_elements(By.CLASS_NAME, "next"):
        url = driver.find_element(By.XPATH, "//li[@class='next']/a").get_attribute("href")
        properties += extract_properties(url)
    return properties
Now you have all the pieces in place to scrape all the listings from idealista.
Going around idealista's captcha
Chances are that when you try to run this automation for the first time, idealista might return a captcha (courtesy of datadome).
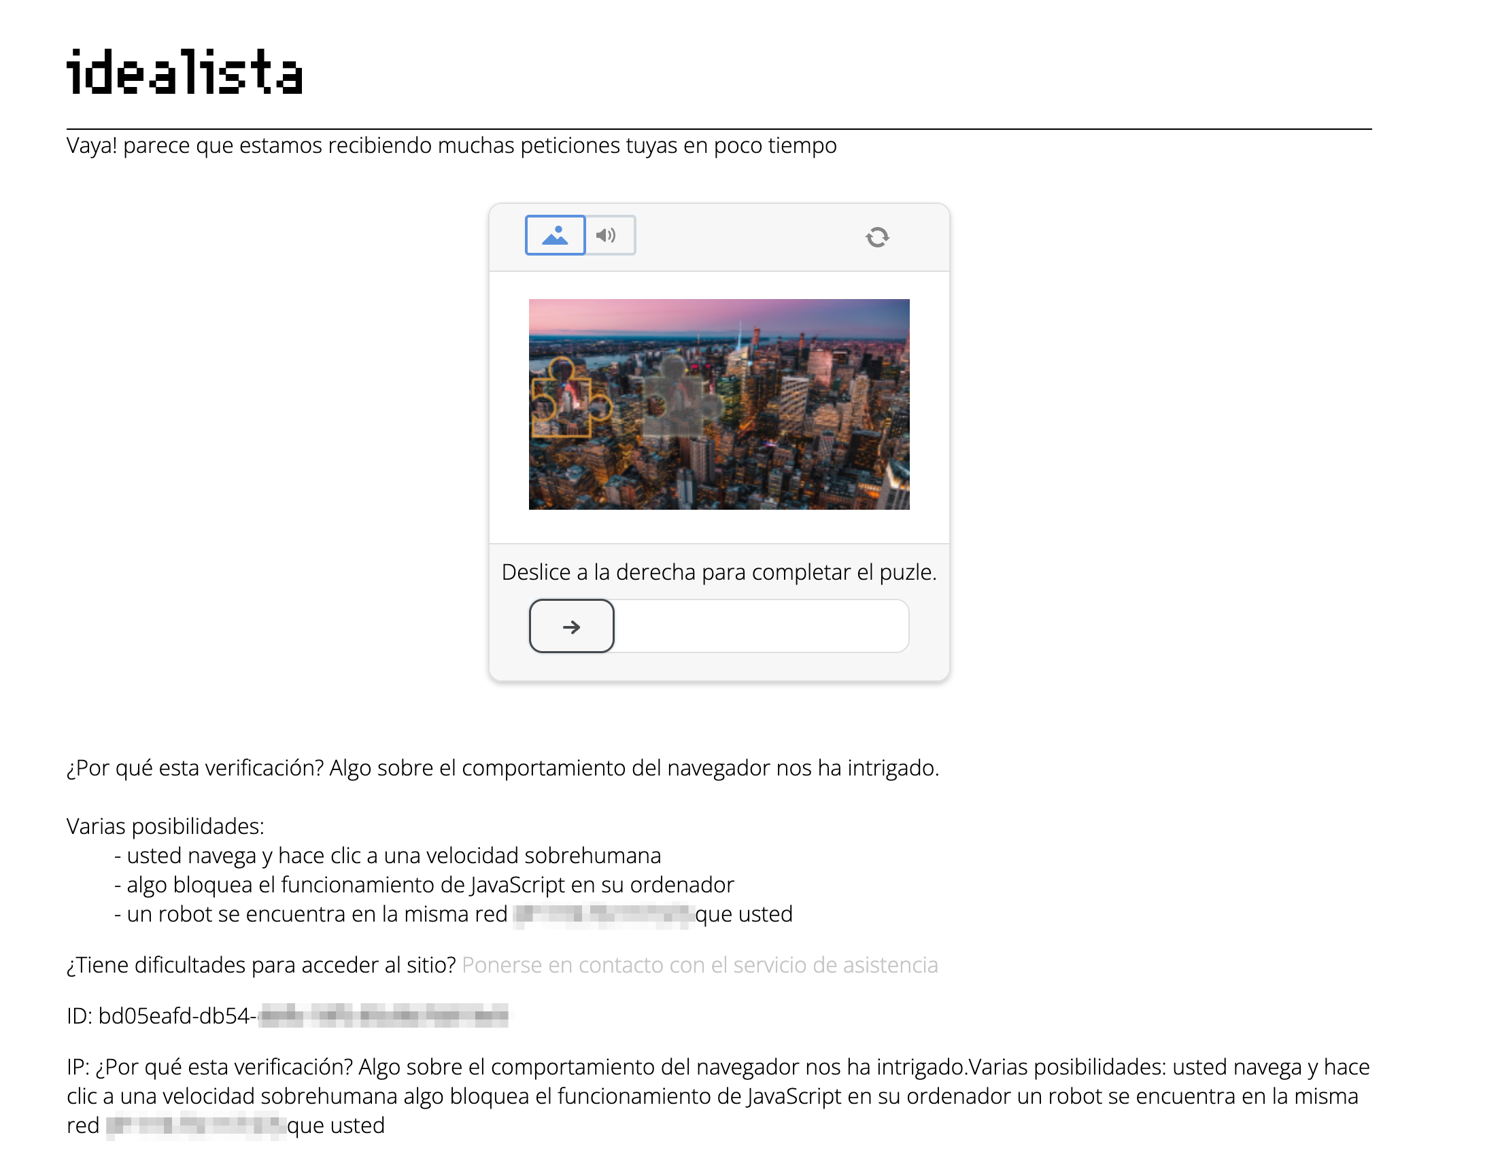
We are using undected_chromedriver to counter this very issue but sometimes this is not enough.
During my testing, I observed two things. Firstly, if I solved the captcha once and continued the same session, idealista didn't show me the captcha again. Secondly, idealista showed me the captcha on the very first visit to the website. The easiest way to incorporate a "solution" based on these observations is to add an input prompt in the code and wait for the user to solve the captcha and then inform the program (Selenium) that the captcha is solved successfully and it can continue the scraping process.
You can modify the extract_provinces function like this:
def extract_provinces():
    driver.get("https://www.idealista.com/")
    input("press any key to continue...")
    provinces_div = driver.find_element(By.CLASS_NAME, 'locations-list')
    provinces = provinces_div.find_elements(By.XPATH, './/a')
    for province in provinces:
        results[province.text] = {
            "url": province.get_attribute('href'),
            "municipalities": {}
        }
Now when you run the code, the program will pause after navigating to idealista homepage. If there is a captcha, you can solve the captcha and then press any key in the terminal to inform the program to continue execution.
Complete code
import undetected_chromedriver as uc
from selenium.webdriver.common.by import By

# https://stackoverflow.com/questions/70485179/runtimeerror-when-using-undetected-chromedriver
driver = uc.Chrome(use_subprocess=True)

results = {}

def extract_provinces():
    driver.get("https://www.idealista.com/")
    input("press any key to continue...")
    provinces_div = driver.find_element(By.CLASS_NAME, 'locations-list')
    provinces = provinces_div.find_elements(By.XPATH, './/a')
    for province in provinces:
        results[province.text] = {
            "url": province.get_attribute('href'),
            "municipalities": {}
        }

def extract_municipalities(province, url):
    driver.get(url)
    municipalities = driver.find_elements(By.XPATH, '//ul[@id="location_list"]//a')
    results[province]['municipalities'] = {}
    for municipality in municipalities:
        results[province]['municipalities'][municipality.text] = {
            "url": municipality.get_attribute('href'),
            "properties": [],
        }

def extract_properties(url):
    driver.get(url)
    property_divs = driver.find_elements(By.XPATH, "//article[contains(@class, 'item')]")
    properties = []
    for div in property_divs:
        property = {}
        property['title'] = div.find_element(By.XPATH, './/a[@class="item-link"]').text
        property['url'] = div.find_element(By.XPATH, './/a[@class="item-link"]').get_attribute('href')
        property['price'] = div.find_element(By.XPATH, './/div[contains(@class, "price-row")]').text
        property['detail'] = div.find_element(By.XPATH, './/div[@class="item-detail-char"]').text
        property['description'] = div.find_element(By.XPATH, './/div[contains(@class, "item-description")]').text
        properties.append(property)

    if driver.find_elements(By.CLASS_NAME, "next"):
        url = driver.find_element(By.XPATH, "//li[@class='next']/a").get_attribute("href")
        properties += extract_properties(url)
    return properties


if __name__ == "__main__":
    extract_provinces()
    for province in results.keys():
        extract_municipalities(province, results[province]['url'])
        for municipality in results[province]['municipalities'].keys():
            municipality_properties = extract_properties(results[province]['municipalities'][municipality]['url'])
            results[province]['municipalities'][municipality]['properties'] = municipality_properties
    print(results)
Avoid getting blocked by using ScrapingBee
If you run your scraper every so often, idealista will block it. They have services in place to figure out when a request is made by a script and, no, simply setting an appropriate User-Agent string is not going to help you bypass that. You will have to use rotating proxies. This can be too much to handle on your own and luckily there is a service to help with that: ScrapingBee.
ScrapingBee provides tools for data extraction and a proxy mode. We will be focusing more on the premium proxy mode in this tutorial. ScrapingBee will make sure that it uses rotating proxies and solves captchas on each request. This will let you focus on the business logic (data extraction) and let ScrapingBee deal with all the grunt work.
Let's look at a quick example of how you can use ScrapingBee. As you will be using ScrapingBee only in the proxy mode, you can skip installing the ScrapingBee SDK. However, you will have to install selenium-wire. This is because Selenium by default does not support authenticated proxies. Selenium Wire adds support for that (on top of additional features) and also supports undetected-chromedriver.
You can install Selenium Wire using the following PIP command:
$ pip install selenium-wire
Next, go to the ScrapingBee website and sign up for an account:
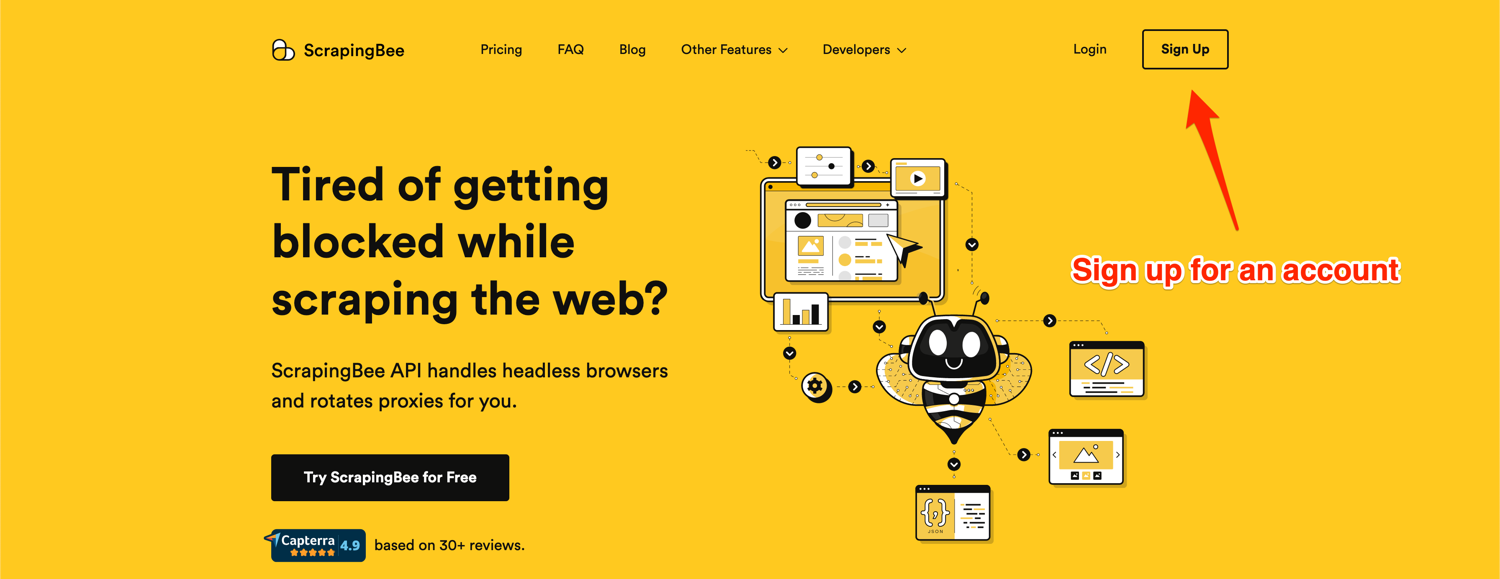
After successful signup, you will be greeted with the default dashboard. Copy your API key from this page and edit the code in your app.py file.
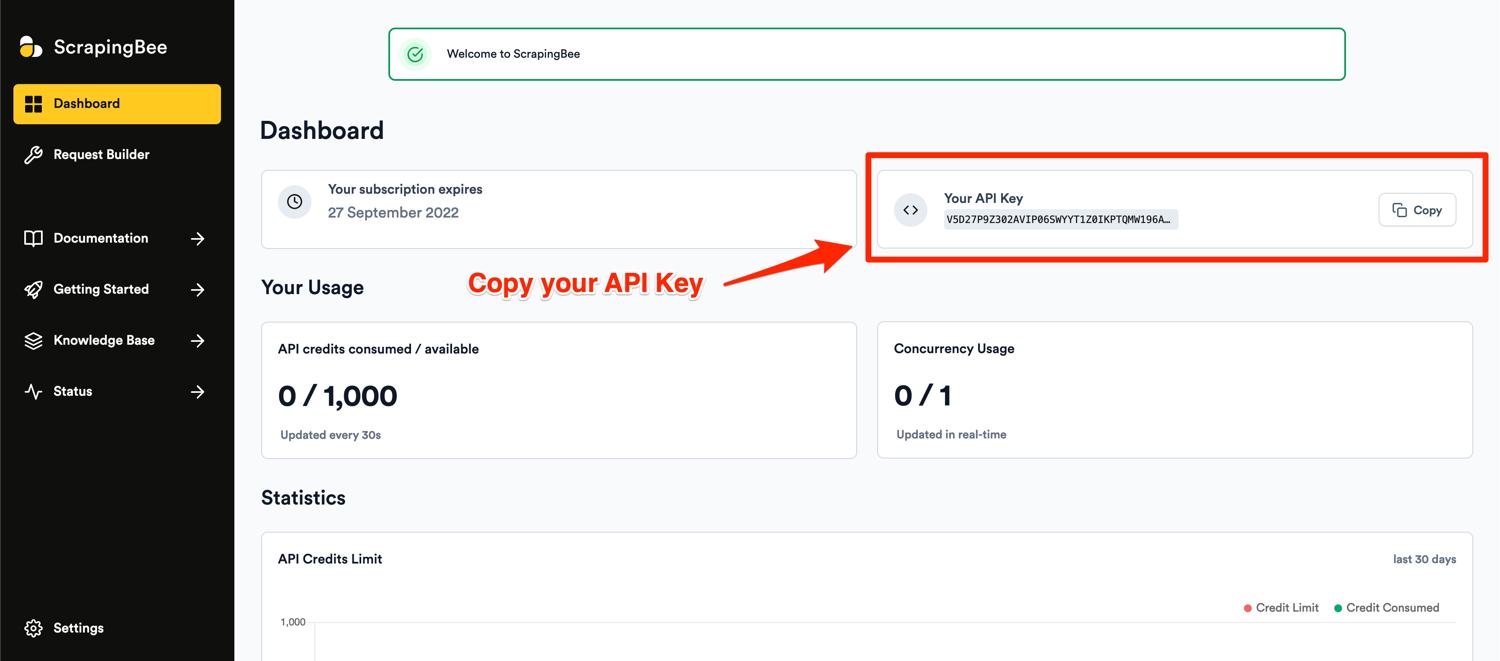
Go to the very beginning of the app.py file and replace the imports and Chrome initialization code with this:
from seleniumwire.undetected_chromedriver import webdriver
from selenium.webdriver.common.by import By

APIKEY = ""
PASS = "render_js=False&premium_proxy=True"

options = {
    'proxy': {
        'http': f'http://{APIKEY}:{PASS}@proxy.scrapingbee.com:8886',
    }
}

driver = webdriver.Chrome(use_subprocess=True, seleniumwire_options=options)
Note: Make sure to replace APIKEY with your API key.
The password field is used to configure the various parameters supported by the ScrapingBee API. In this example, I am disabling JS rendering and asking ScrapingBee to use premium proxies.
The rest of your code can stay the same. Now all of your requests to idealista will use the premium proxies provided by ScrapingBee and you won't have to worry about getting blocked.
Conclusion
You learned how to scrape data from idealista using undetected_chromedriver and selenium while also evading bot detection using some very basic techniques. You also saw how easy it is to use ScrapingBee to add rotating proxies support in your scraper. You can extend the same codebase to cover other versions of idealista that operate in Italy and Portugal. This was a very simple and rudimentary example of web scraping. In a real-world project, you should use proper error handling and also make sure to save data to external storage at relevant intervals. This way you will not lose all of your data due to an unexpected crash.
We hope you learned something new today. If you have any questions please do not hesitate to reach out. We would love to take care of all of your web scraping needs and assist you in whatever way possible!
Before you go, check out these related reads:

Yasoob is a renowned author, blogger and a tech speaker. He has authored the Intermediate Python and Practical Python Projects books ad writes regularly. He is currently working on Azure at Microsoft.
