Realtor is the second biggest real estate listing website in the US and contains millions of properties. You will be missing out on saving money if you don't do market research on realtor before doing your next property purchase. To make use of the treasure trove of data available on realtor, it is necessary to scrape it. This tutorial will show you exactly how you can do that while bypassing the bot detection used by realtor.com.
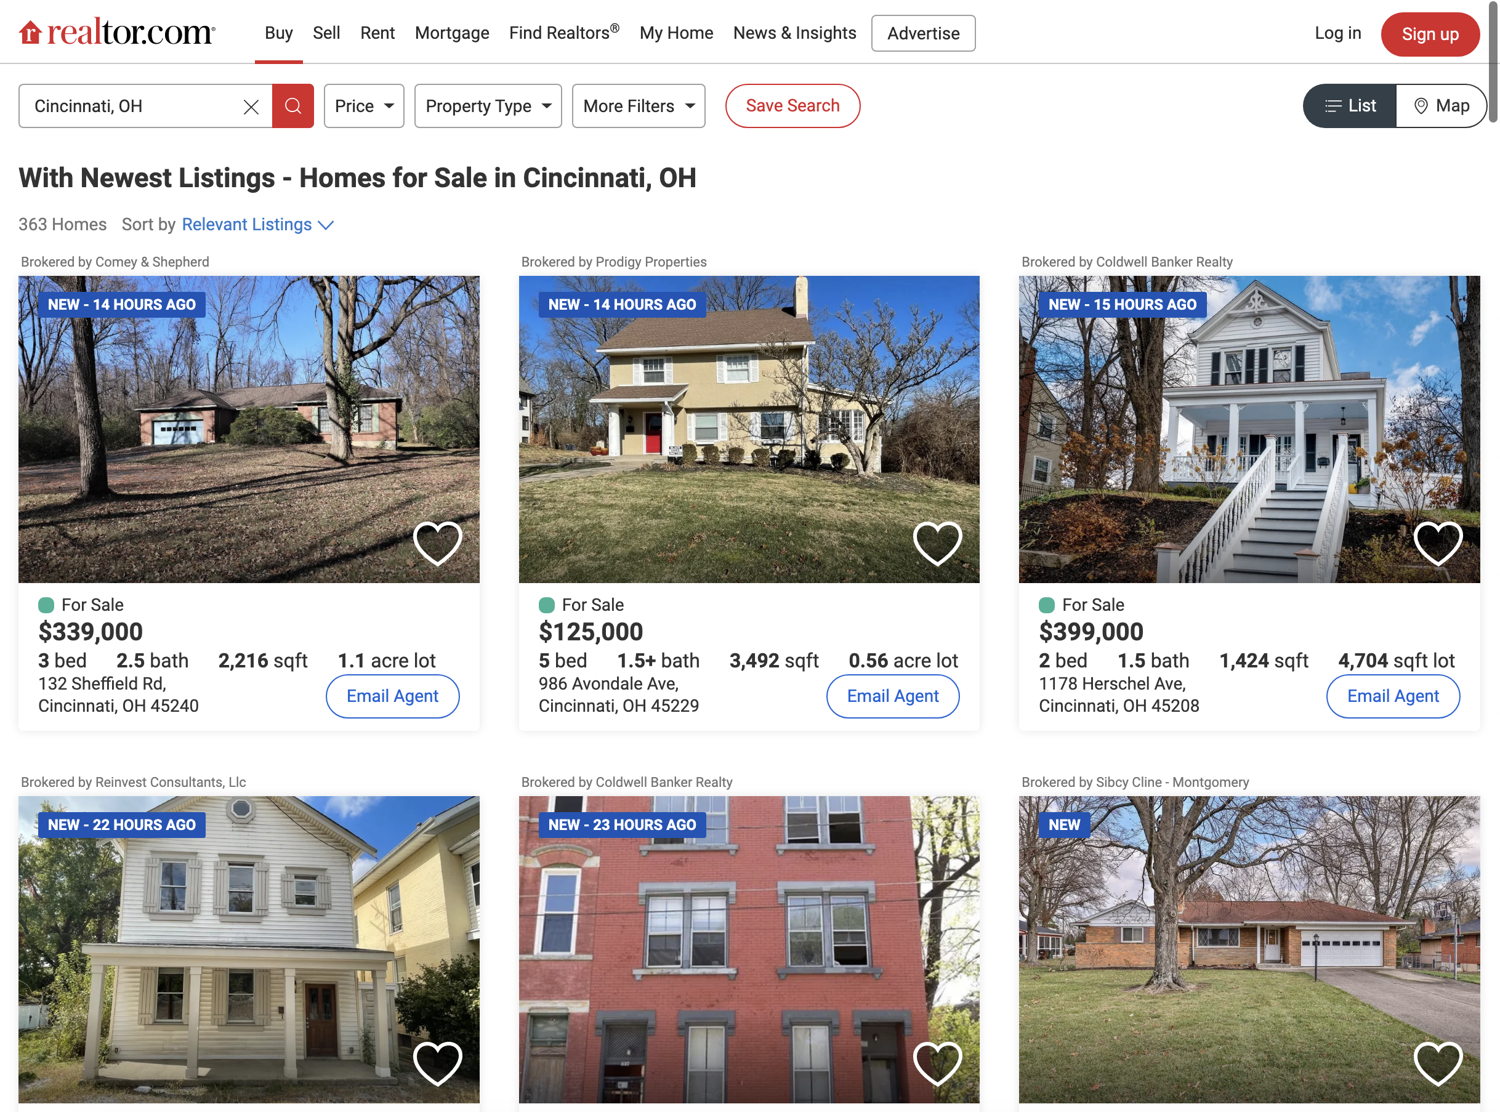
You can go and explore the search results page of realtor.com by going to this link. You will be scraping data from this page.
💡Interested in scraping Real Estate data? Check out our guide on How to scrape Zillow with Python

Setting up the prerequisites
This tutorial will use Python 3.10.0 but it should work with most of the recent Python versions. Start by creating a separate directory for this project and create a new Python file within it:
$ mkdir realtor_scraper
$ cd realtor_scraper
$ touch app.py
You will need to install the following libraries to continue:
You can install both of these via the following PIP command:
$ pip install selenium undetected-chromedriver
Selenium will provide you with all the APIs to programmatically control a web browser and undetected-chromedriver patches Selenium Chromedriver to make sure the website does not know you are using Selenium to access the website. This will help in evading the basic bot detection mechanisms used by realtor.com.
Fetching realtor search results page
Let's fetch the realtor search results page using undetected-chromedriver and selenium:
import undetected_chromedriver as uc

driver = uc.Chrome(use_subprocess=True)
driver.get("https://www.realtor.com/realestateandhomes-search/Cincinnati_OH/show-newest-listings")
Save this code in app.py and run it. It should open up a Chrome window and navigate it to the realtor.com search results page. I like to run the code snippets in a Python shell to quickly iterate on ideas and then save the final code to a file. You can follow the same pattern for this tutorial.
This tutorial is going to scrape search results for Cincinnati, OH. You can scrape results for a different city and state by modifying the URL and replacing the city and state with your desired one. For instance, Redmond, WA will result in this URL:
https://www.realtor.com/realestateandhomes-search/Redmond_WA/show-newest-listings
It is better to do it this way instead of automating the search bar because realtor starts offering suggestions when you start typing something in the search bar. This messes up with the automation. Moreover, the URL is so predictable that you can go pretty far just by hardcoding your desired search queries in it.
Deciding what to scrape
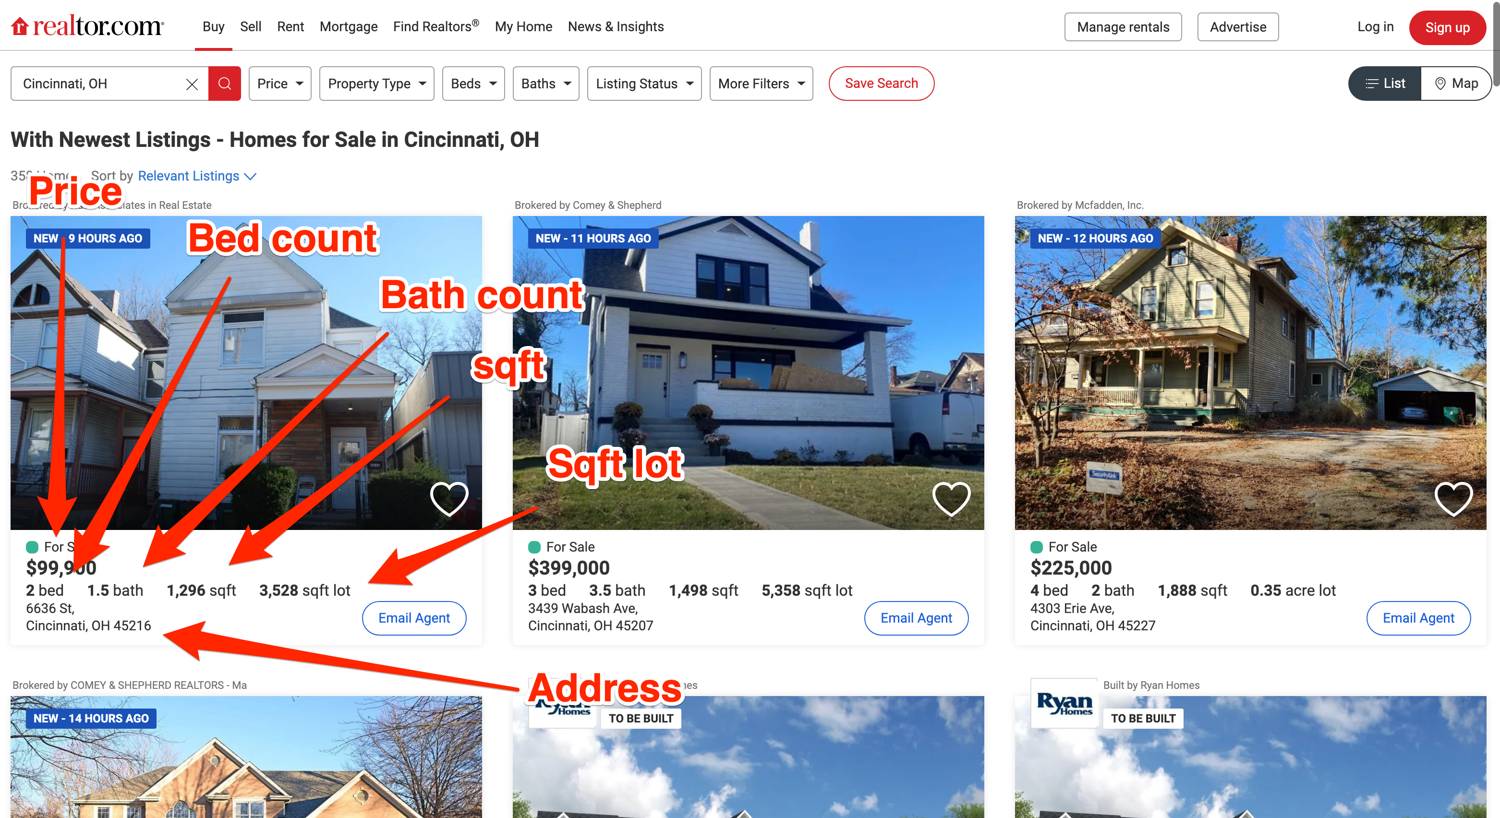
It is very important to have a clear idea of which data you want to extract from the website. This tutorial will focus on extracting the price, bed count, bath count, sqft, sqft lot amount, and the address associated with easy property listing.
The final output will be similar to this:
[
    {
        'address': '6636 St, Cincinnati, OH 45216',
        'baths': '1.5bath',
        'beds': '2bed',
        'price': '$99,900',
        'sqft': '1,296sqft',
        'plot_size': '3,528sqft lot'
    },
    {
        'address': 'Shadow Hawk 4901 Shadow Hawk Drive, Green '
        'Township, OH 45247',
        'baths': '2bath',
        'beds': '3bed',
        'price': 'From$472,995',
        'sqft': '1,865sqft',
        'plot_size': ''
    },
    # Additional properties
]
Below you can see an annotated screenshot showcasing where all of this information about each property is located:
Scraping the listing divs
You will be using the default methods (find_element + find_elements) that Selenium provides for accessing DOM elements and extracting data from them. Additionally, you will be relying on XPath for locating the DOM elements.
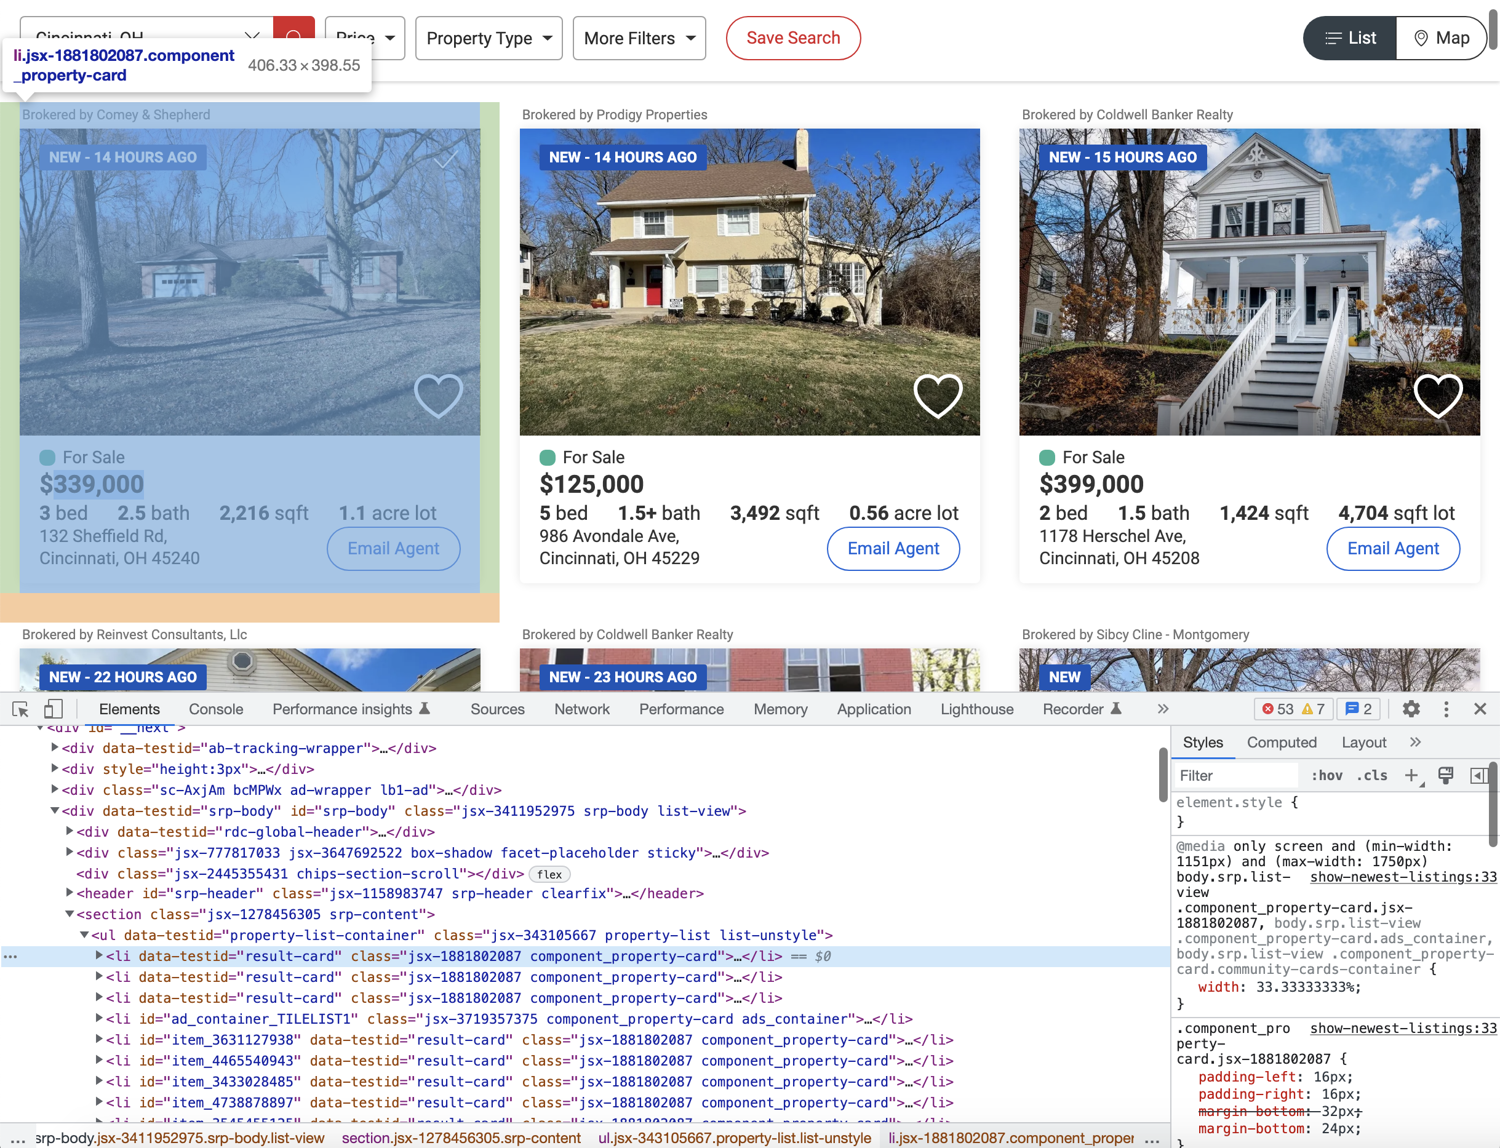
Before you can start writing extraction code, you need to spend some time exploring the HTML structure of the page. You can do that by opening up the web page in Chrome, right-clicking any area of interest, and selecting Inspect. This will open up the developer tools panel and you can click around to figure out which tag encapsulates the required information. This is one of the most common workflows used in web scraping.
As you can see in the image below, each property listing is nested within an li tag with the data-testid attribute of result-card:
You can use this information along with the XPATH selector to extract and collect all the individual listings inside a list. Afterward, you can extract individual information from each listing. To extract all listings you can use the following code:
from selenium.webdriver.common.by import By

# ...

properties = driver.find_elements(By.XPATH, "//li[@data-testid='result-card']")
This is just one method of data extraction. You can use a CSS selector or a host of other selectors that Selenium supports. The XPath expression used above tells Selenium to extract all the li tags (//li) that have the data-testid attribute set to result-card.
Scraping individual listing data
Now that you have successfully scraped all the listings, you can loop over them and scrape individual listing data. Go ahead and explore the price and try to figure out how you can extract it.
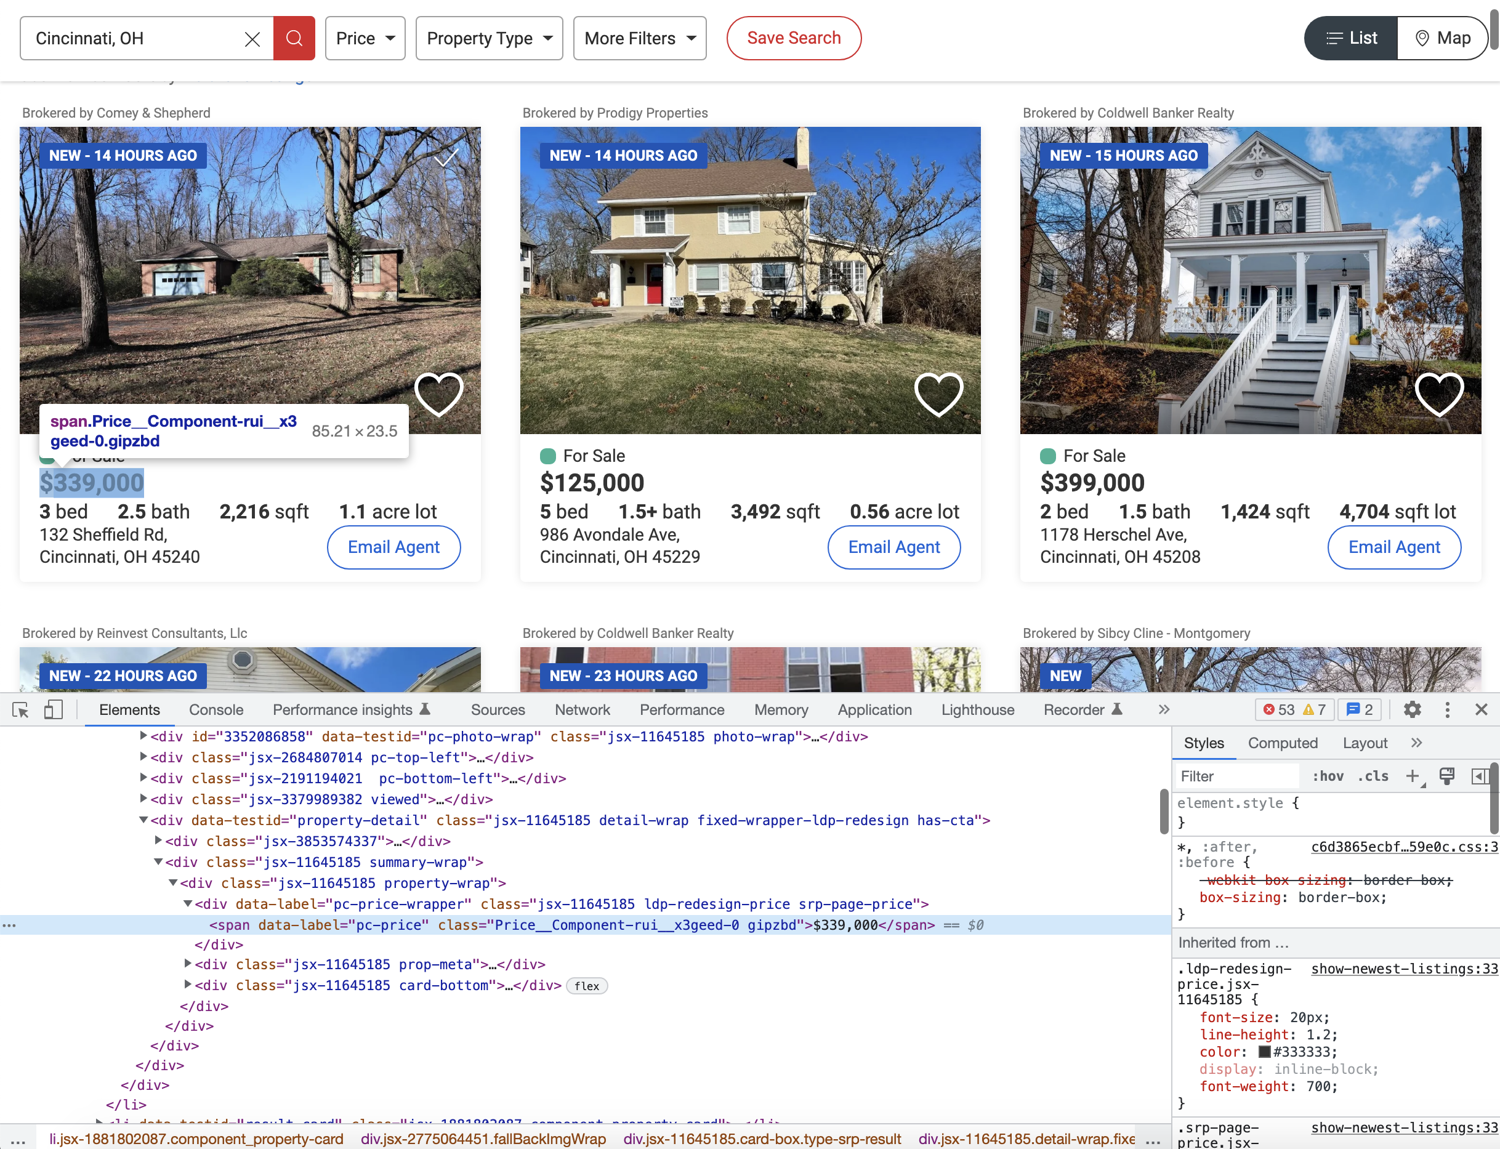
Based on the image above, it seems like you can extract the price by targetting the span with the data-label attribute of pc-price. This is exactly what the following code does:
for property in properties:
    property_data = {}
    property_data['price'] = property.find_element(By.XPATH, ".//span[@data-label='pc-price']").text
Take note of the XPath expression used above. It starts with .. This makes sure that the XPath extracts only those spans that are nested within the property div. If you get rid of the period then it will always return the first span in the HTML document with the data-label of pc-price.
We also chain the find_element method with the .text attribute. It returns all the visible text from within the element returned by find_element.
Next up, explore where the bed, bath, sqft, and plot size information is located in the DOM.
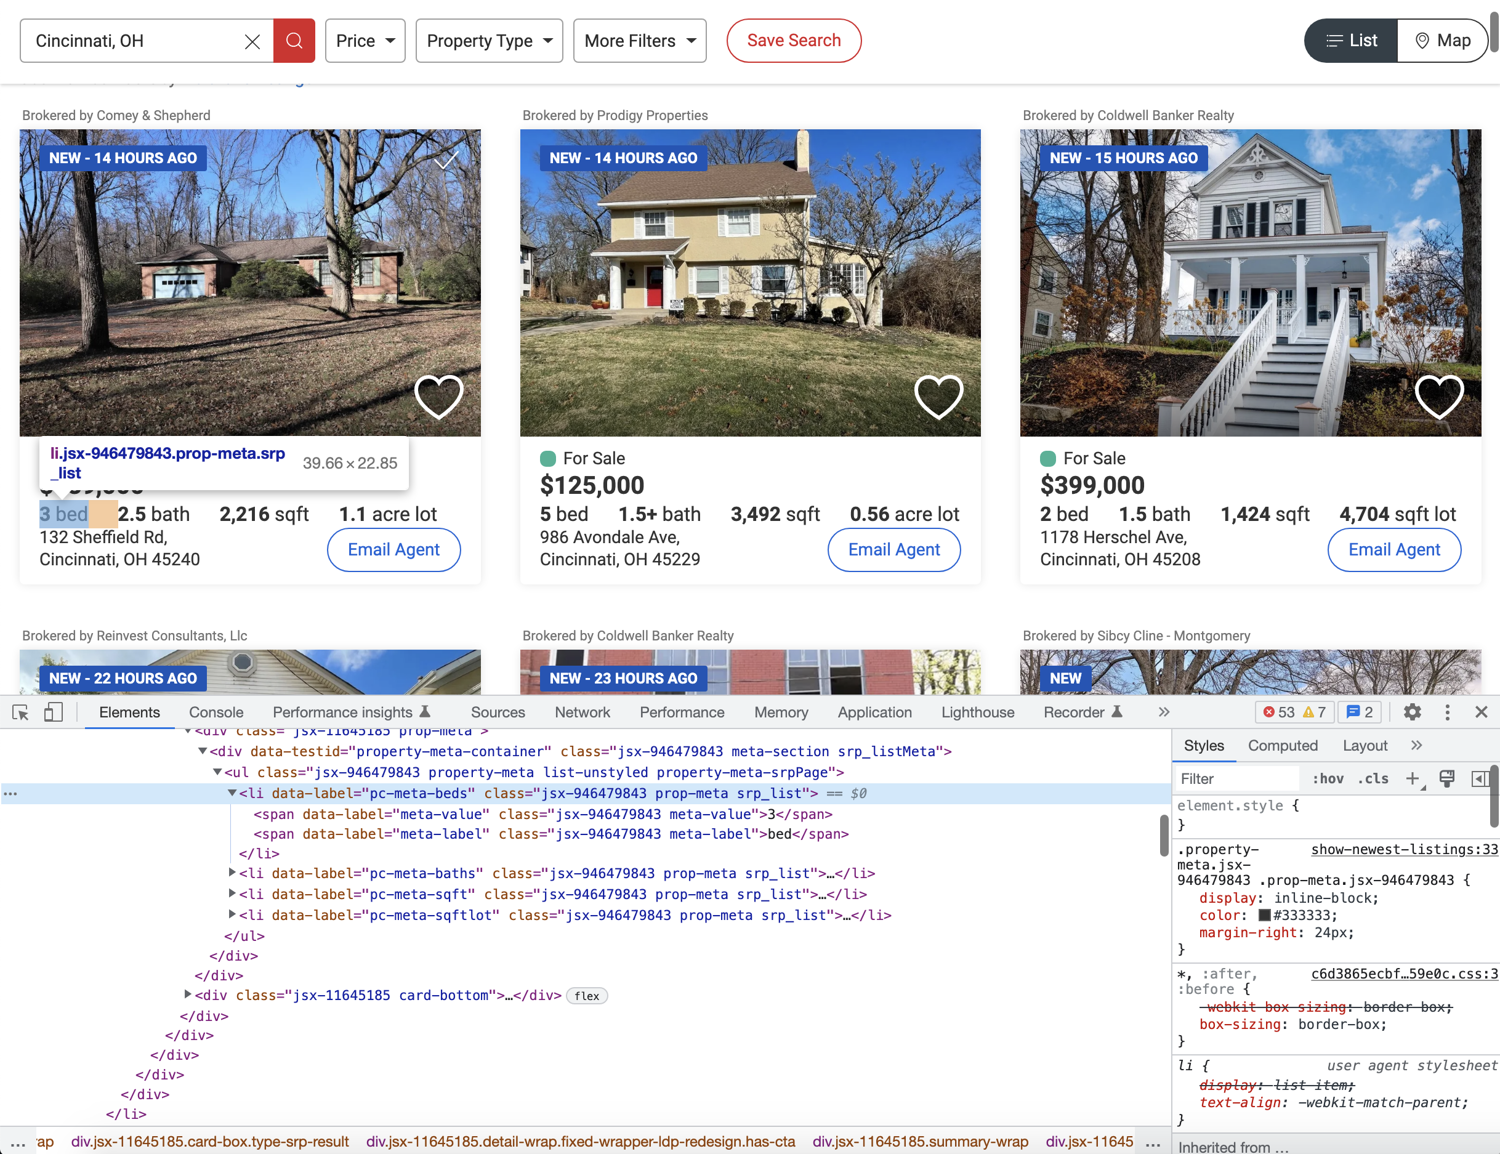
The image above shows that all of these bits of information are stored in individual li tags with distinct data-label attributes. But one thing to note here is that every property does not contain all four of these data points. You need to structure your extraction code appropriately so that it doesn't break:
for property in properties:
    property_data = {}
    property_data['price'] = property.find_element(By.XPATH, ".//span[@data-label='pc-price']").text
    if property.find_elements(By.XPATH, ".//li[@data-label='pc-meta-beds']"):
  	  property_data['beds'] = property.find_element(By.XPATH, ".//li[@data-label='pc-meta-beds']").text
    if property.find_elements(By.XPATH, ".//li[@data-label='pc-meta-baths']"):
	    property_data['baths'] = property.find_element(By.XPATH, ".//li[@data-label='pc-meta-baths']").text
    if property.find_elements(By.XPATH, ".//li[@data-label='pc-meta-sqft']"):
    	property_data['sqft'] = property.find_element(By.XPATH, ".//li[@data-label='pc-meta-sqft']").text
    if property.find_elements(By.XPATH, ".//li[@data-label='pc-meta-sqftlot']"):
    	property_data['plot_size'] = property.find_element(By.XPATH, ".//li[@data-label='pc-meta-sqftlot']").text
To figure out if a particular tag exists on the page, the code above makes use of the find_elements method. If the return value is an empty list then you can be sure that the tag is not available. Everything else is similar to what we did for extracting the property price.
Finally, flex your detective muscles and try to figure out how to extract the address. Hint: It is not any different from what we did earlier for other data points.
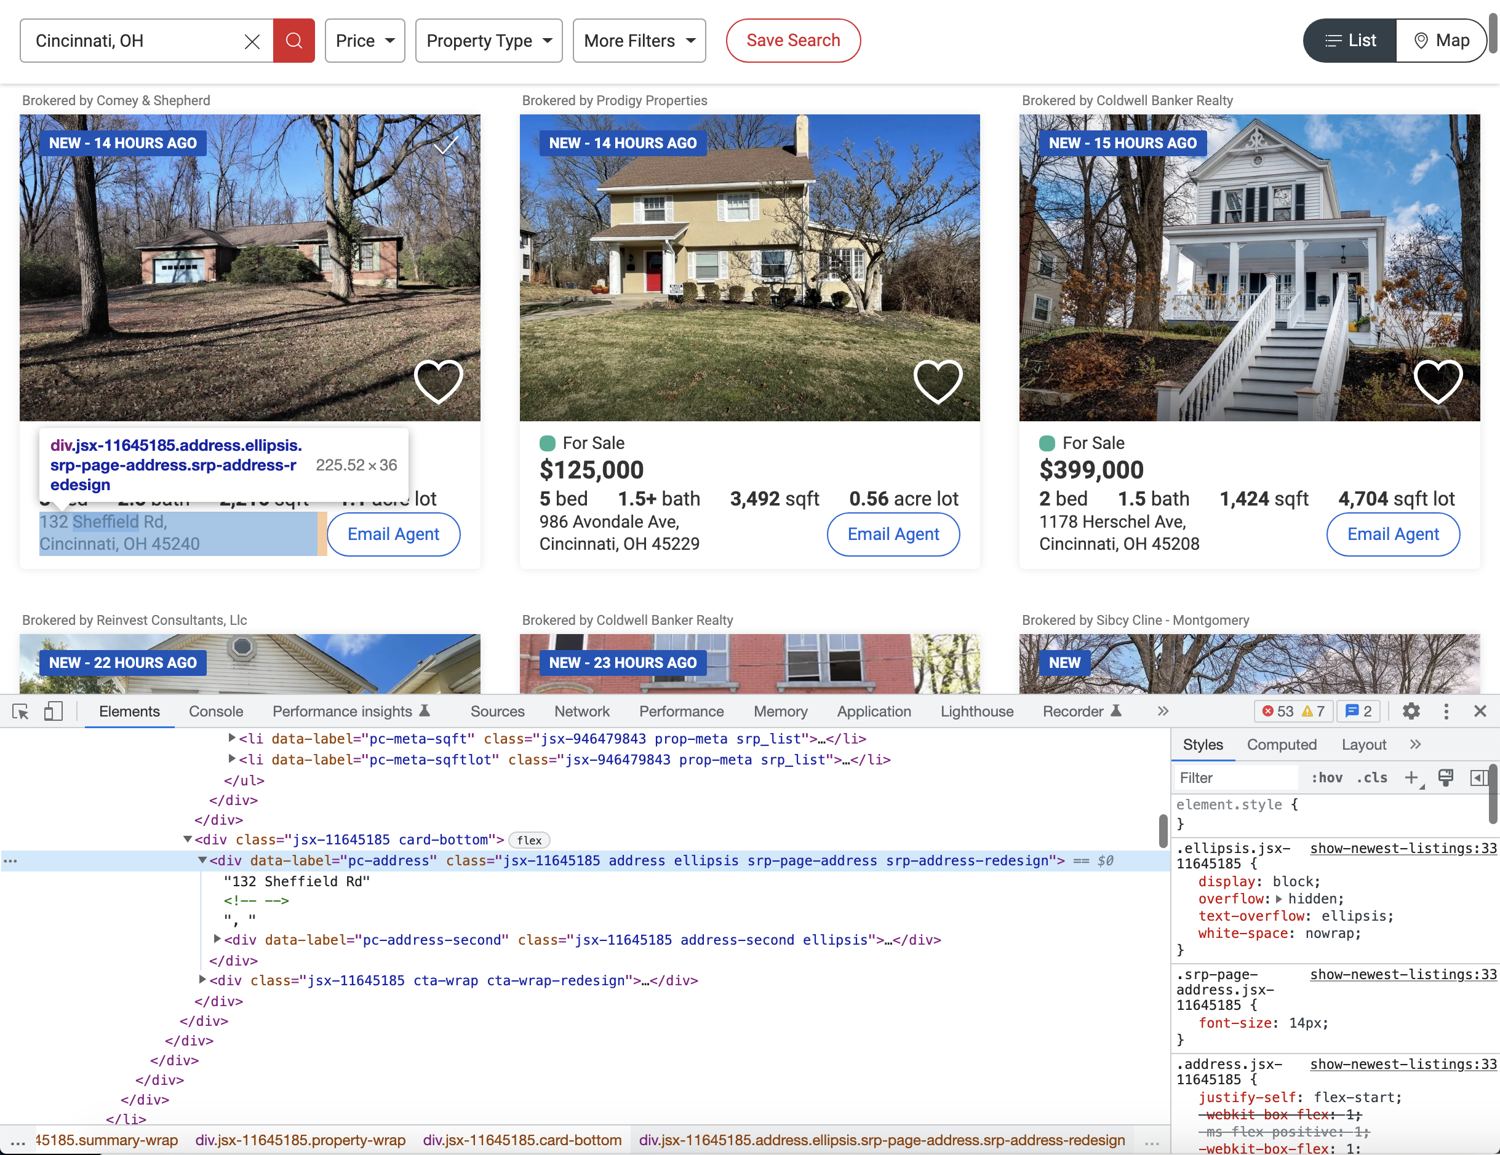
The following code will do the trick:
for property in properties:
		# ...
    if property.find_elements(By.XPATH, ".//div[@data-label='pc-address']"):
        property_data['address'] = property.find_element(By.XPATH, ".//div[@data-label='pc-address']").text
Making use of pagination
You might have observed that the search result pages are paginated. There are pagination controls toward the bottom of the page:

You can modify your code easily to make use of this pagination. Instead of using the individually numbered links, you can simply rely on the Next link. This link will contain a valid href if there is a next page available.
This is what the HTML structure looks like for the Next link:
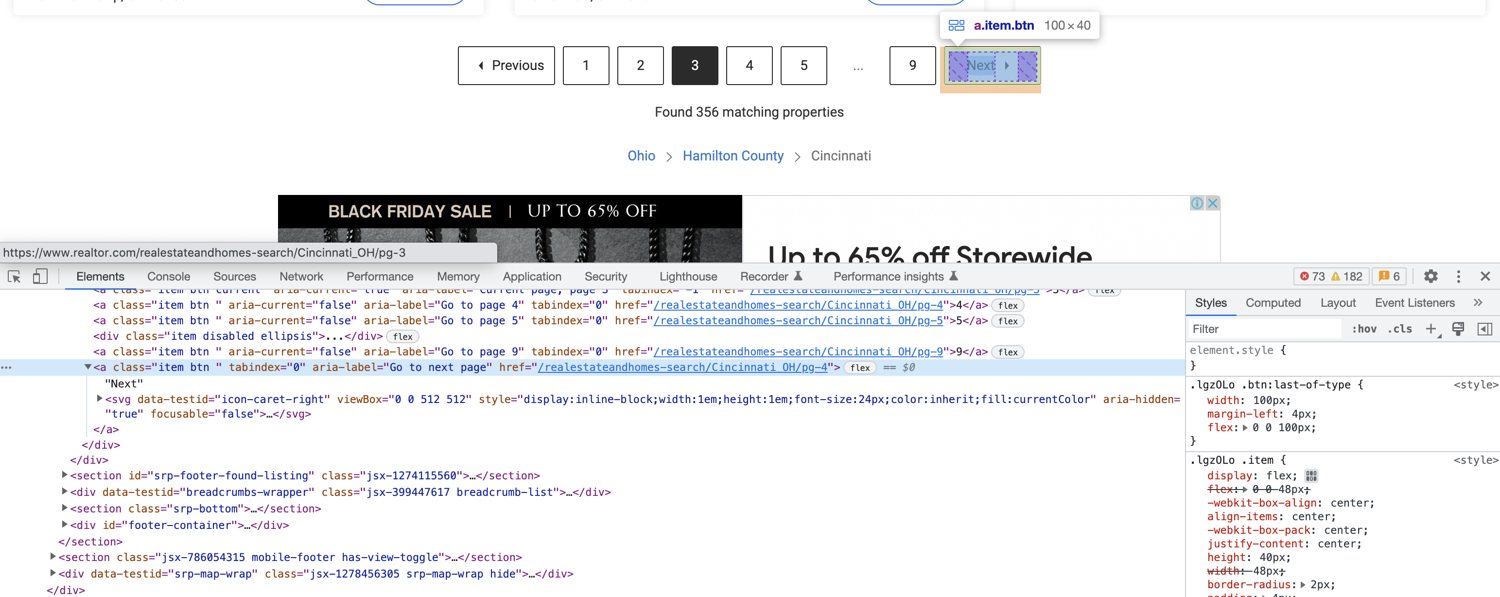
You can extract the href from this anchor tag using the following code:
next_page_url = driver.find_element(By.XPATH, "//a[@aria-label='Go to next page']").get_attribute('href')
You can use this URL to make the browser navigate to the next page. You can also try to simulate a click. It is your call. I prefer directly navigating to the URL as this will not result in XHR calls and will keep things simple.
Complete code
You will have to restructure your code a little bit to make use of pagination. It will look something like this at the end:
import undetected_chromedriver as uc
from selenium.webdriver.common.by import By

# https://stackoverflow.com/questions/70485179/runtimeerror-when-using-undetected-chromedriver
driver = uc.Chrome(use_subprocess=True)

driver.get("https://www.realtor.com/realestateandhomes-search/Cincinnati_OH/show-newest-listings")

all_properties = []

def extract_properties():
    properties = driver.find_elements(By.XPATH, "//li[@data-testid='result-card']")

    for property in properties:
        property_data = {}
        property_data['price'] = property.find_element(By.XPATH, ".//span[@data-label='pc-price']").text
        if property.find_elements(By.XPATH, ".//li[@data-label='pc-meta-beds']"):
            property_data['beds'] = property.find_element(By.XPATH, ".//li[@data-label='pc-meta-beds']").text
        if property.find_elements(By.XPATH, ".//li[@data-label='pc-meta-baths']"):
            property_data['baths'] = property.find_element(By.XPATH, ".//li[@data-label='pc-meta-baths']").text
        if property.find_elements(By.XPATH, ".//li[@data-label='pc-meta-sqft']"):
            property_data['sqft'] = property.find_element(By.XPATH, ".//li[@data-label='pc-meta-sqft']").text
        if property.find_elements(By.XPATH, ".//li[@data-label='pc-meta-sqftlot']"):
            property_data['plot_size'] = property.find_element(By.XPATH, ".//li[@data-label='pc-meta-sqftlot']").text
        if property.find_elements(By.XPATH, ".//div[@data-label='pc-address']"):
            property_data['address'] = property.find_element(By.XPATH, ".//div[@data-label='pc-address']").text
        all_properties.append(property_data)


if __name__ == "__main__":
    extract_properties()
    while True:
        next_page_url = driver.find_element(By.XPATH, "//a[@aria-label='Go to next page']").get_attribute('href')
        if "http" in next_page_url:
            driver.get(next_page_url)
        else:
            break
        extract_properties()
    print(all_properties)
Bypassing captcha using ScrapingBee
If you continue scraping, you will eventually encounter this captcha screen:

undetected_chromedriver already tries to make sure you don't encounter this screen but it is extremely difficult to fully bypass it. One option is to solve the captcha manually and then continue the scraping but there is no guarantee how frequently you will encounter this screen. Thankfully there are some solutions available and one such solution is ScrapingBee.
You can use ScrapingBee to extract information from whichever page you want and ScrapingBee will make sure that it uses rotating proxies and solves captchas all on its own. This will let you focus on the business logic (data extraction) and let ScrapingBee deal with all the grunt work of not getting blocked.
Let's look at a quick example of how you can use ScrapingBee. First, go to the terminal and install the ScrapingBee Python SDK:
$ pip install scrapingbee
Next, go to the ScrapingBee website and sign up for an account:

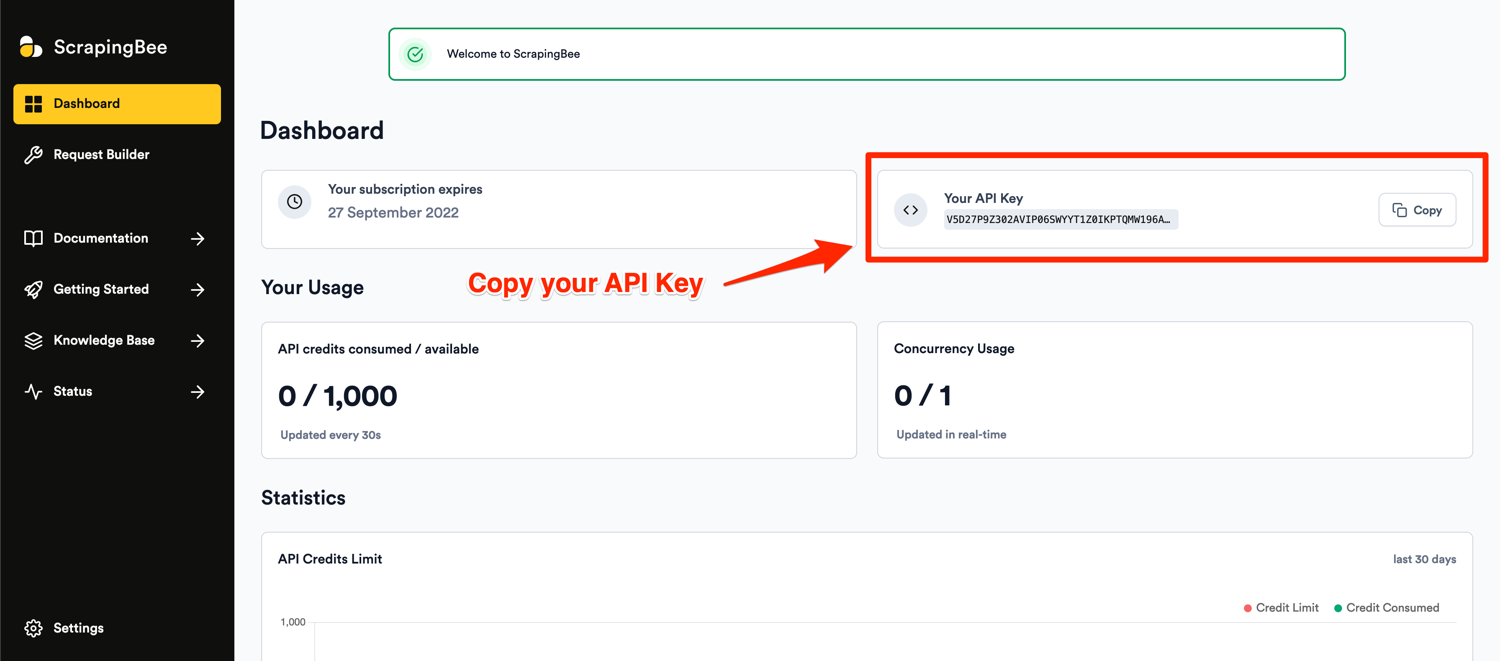
After successful signup, you will be greeted with the default dashboard. Copy your API key from this page and start writing some code in a new Python file:
Let me show you some code first and then explain what is happening:
from pprint import pprint
from scrapingbee import ScrapingBeeClient

client = ScrapingBeeClient(api_key='YOUR_API_KEY')

url = "https://www.realtor.com/realestateandhomes-search/Cincinnati_OH/show-newest-listings"

response = client.get(
    url,
    params={
        'extract_rules': {
            "properties": {
                "selector": "li[data-testid='result-card']",
                "type": "list",
                "output": {
                    "price": {
                        "selector": "span[data-label='pc-price']",
                    },
                    "beds": {
                        "selector": "li[data-label='pc-meta-beds']",
                    },
                    "baths": {
                        "selector": "li[data-label='pc-meta-baths']",
                    },
                    "sqft": {
                        "selector": "li[data-label='pc-meta-sqft']",
                    },
                    "plot_size": {
                        "selector": "li[data-label='pc-meta-sqftlot']",
                    },
                    "address": {
                        "selector": "div[data-label='pc-address']",
                    },
                }
            },
            "next_page": {
                "selector": "a[aria-label='Go to next page']",
                "output": "@href"
            }
        }
    }
)

if response.ok:
    scraped_data = response.json()
    pprint(scraped_data)
Don't forget to replace YOUR_API_KEY with your API key from ScrapingBee. The selectors in the code above might look similar to the XPath expressions you were using with only a few minor differences. This code makes use of ScrapingBee's powerful extract rules. It allows you to state the tags and selectors that you want to extract the data from and ScrapingBee will return you the scraped data. You will not have to run a full Selenium + Chrome process on your machine and instead offload that processing to ScrapingBee's servers.
ScrapingBee also executes JavaScript by default and will run the extraction rules after the page fully loads and all scripts have been successfully executed. This is very useful as more and more SPAs (Single Page Applications) are popping up each day. The extractor rules are also nested to resemble the workflow we used before where we extracted individual property divs and then extracted the information from those divs. You can modify the code further and make recursive requests to ScrapingBee as long as next_page returns a valid URL. You can read the ScrapingBee docs to learn more about what is possible with the platform.
If you run the code above, the output will be similar to this:
{
    'next_page': '/realestateandhomes-search/Cincinnati_OH/pg-2',
    'properties': [{
            'address': '6636 St, Cincinnati, OH 45216',
            'baths': '1.5bath',
            'beds': '2bed',
            'price': '$99,900',
            'sqft': '1,296sqft',
            'plot_size': '3,528sqft lot'
        },
        {
            'address': '3439 Wabash Ave, Cincinnati, OH 45207',
            'baths': '3.5bath',
            'beds': '3bed',
            'price': '$399,000',
            'sqft': '1,498sqft',
            'plot_size': '5,358sqft lot'
        },
        # Additional properties
    ]
}
Note: ScrapingBee will make sure that you are charged only for a successful response which makes it a really good deal.
Conclusion
This tutorial just showed you the basics of what is possible with Selenium and ScrapingBee. If your project grows in size and you want to extract a lot more data and want to automate even more stuff, you should look into Scrapy. It is a full-fledged Python web scraping framework that features pause/resume, data filtration, proxy rotation, multiple output formats, remote operation, and a whole load of other features.
You can wire up ScrapingBee with Scrapy to utilize the power of both and make sure your scraping is not affected by websites that continuously throw a captcha.
We hope you learned something new today. If you have any questions please do not hesitate to reach out. We would love to take care of all of your web scraping needs and assist you in whatever way possible!
Before you go, check out these related reads:

Yasoob is a renowned author, blogger and a tech speaker. He has authored the Intermediate Python and Practical Python Projects books ad writes regularly. He is currently working on Azure at Microsoft.
